Skip to content

@JaredMeredith

Learn. Share. Repeat.

Contact

  • Blog
  • About Me
  • Strengths Finder Top 5
    • Strengths Finder All 34
  • 16Peronalities
  • Builder Profile 10
  • Need To Clean Your IIS Log Files (Older Than x Number of Days) For All Sites? Here’s a Script

    01/15/2016

    +

    +

    +

    +

    +

    +

    You may have the classic issue of needing logs cleared but you do not have time to log onto each server and delete files for space. Here’s a script that will do it for all IIS sites and will let you select how many days back you wish to keep. For this example this script is wrote for 30 days and would be run on a task scheduler monthly.

    • Open notepad and create a file called IISLogMonthlyCleanup.vbs
    • Put in the following snippet and adjust your settings to apply to what you need:
    sLogFolder = "c:\inetpub\logs\LogFiles"
    iMaxAge = 30 ' # of days
    Set objFSO = CreateObject("Scripting.FileSystemObject")
    set colFolder = objFSO.GetFolder(sLogFolder)
    For Each colSubfolder in colFolder.SubFolders
     Set objFolder = objFSO.GetFolder(colSubfolder.Path)
     Set colFiles = objFolder.Files
     For Each objFile in colFiles
     iFileAge = now-objFile.DateCreated
     if iFileAge > (iMaxAge+1) then
     objFSO.deletefile objFile, True
     end if
     Next
    Next
    

    Save and run. *Poof* the old logs are gone. Set it up in a task scheduler and move on to more important things.

    TIP: You can run the scheduled task as SYSTEM since it has privileges to run whether logged on or not. It also has access to the file system.

    Hope this helps.

    Help me out and share!

    • Email a link to a friend (Opens in new window) Email
    • Print (Opens in new window) Print
    • Share on LinkedIn (Opens in new window) LinkedIn
    • Share on Facebook (Opens in new window) Facebook
    • Share on X (Opens in new window) X
    • Share on Reddit (Opens in new window) Reddit
    • Share on Tumblr (Opens in new window) Tumblr
    • More
    • Share on Pinterest (Opens in new window) Pinterest
    • Share on Telegram (Opens in new window) Telegram
    • Share on WhatsApp (Opens in new window) WhatsApp
    Like Loading…

    +

    +

    +

    +

    +

    +

    + IIS, Programming, VB
    + IIS, Logs, Programming, Scripting, task scheduler, VBS

    +

    +

    +

    +

    +

    +

    +

    +

    +

    +

    +

    +

  • Using Encryption and Decryption on a .Net Web.Config ConnectionString

    01/14/2016

    +

    +

    +

    +

    +

    +

    If you have .Net web applications that are connecting to data sources that you do not want other users to know about then chances are it is about time to start encrypting the connection strings. Why is this important? If you have an external website that fails (and you do not have any custom error pages) then you may expose connection information in the stack trace or error messages. Also, you do not want to allow other developers that stumble upon your connection string to see your connection information in clear text. Over time and many applications later I went from trying to remember paths and commands and have created batch files to perform this on a minimal web.config.

    I am going to walk through how to create some encrypt/decrypt batch files and how these are used in conjunction with your web.config.

    • Ensure you have a .Net Framework installed to use the aspnet_regiis.exe program. For this example we are using .Net Framework 4.0.
    • Create a folder for all of your files to sit inside of. For this demo let’s call the folder “decrypter”. Make note of where you are storing this folder to use in your batch files in the next steps. For this example let’s assume “C:\decrypter”
    • Open notepad and create a file named Decrypt.bat and add the following information (take note of the path you’ll need to update based on where you are going to store your folder):
    echo Decrypting connection strings
    C:\Windows\Microsoft.NET\Framework64\v4.0.30319\aspnet_regiis.exe -pdf "connectionStrings" "C:\decrypter"
    Pause
    
    • Open notepad again and create a file named Encrypt.bat and add the following information (take note of the path you’ll need to update based on where you are going to store your folder):
    echo Encrypting connection strings
    C:\Windows\Microsoft.NET\Framework64\v4.0.30319\aspnet_regiis.exe -pef "connectionStrings" "C:\decrypter"
    Pause
    
    • Open notepad again and create a web.config file and insert your connectionstrings section inside (make sure to place this file in the same location as the batch files, you’ll use this over and over):
    <?xml version="1.0" encoding="utf-8"?>
    <configuration>
    <connectionStrings>
     <add name="Demo" connectionString="Data Source=123.45.67.89;Initial Catalog=DemoCatalog;Persist Security Info=True;User ID=specialuser;Password=specialpassword" providerName="System.Data.SqlClient" />
     </connectionStrings>
    </configuration>
    
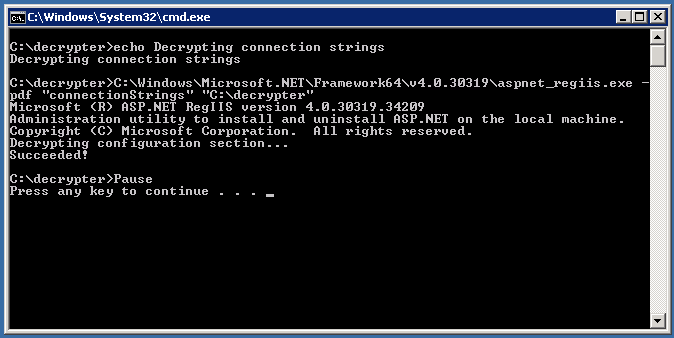
    • Once you have that saved, run your Encrypt.bat as administrator. You should see the following:
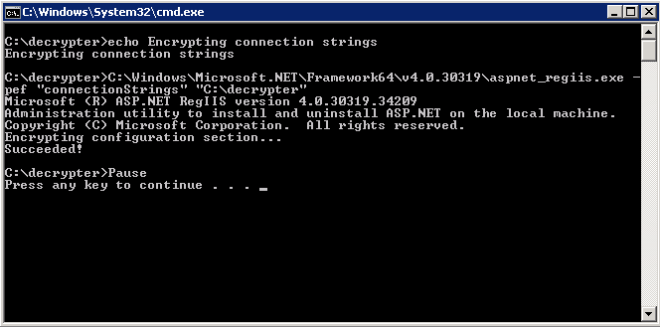
    en-example

    • Your connection strings are now encrypted. Review your web.config and see:
    <?xml version="1.0" encoding="utf-8"?>
    <configuration>
    <connectionStrings configProtectionProvider="RsaProtectedConfigurationProvider">
     <EncryptedData Type="http://www.w3.org/2001/04/xmlenc#Element"
     xmlns="http://www.w3.org/2001/04/xmlenc#">
     <EncryptionMethod Algorithm="http://www.w3.org/2001/04/xmlenc#tripledes-cbc" />
     <KeyInfo xmlns="http://www.w3.org/2000/09/xmldsig#">
     <EncryptedKey xmlns="http://www.w3.org/2001/04/xmlenc#">
     <EncryptionMethod Algorithm="http://www.w3.org/2001/04/xmlenc#rsa-1_5" />
     <KeyInfo xmlns="http://www.w3.org/2000/09/xmldsig#">
     <KeyName>Rsa Key</KeyName>
     </KeyInfo>
     <CipherData>
     <CipherValue>You'll Have A Cipher Here.</CipherValue>
     </CipherData>
     </EncryptedKey>
     </KeyInfo>
     <CipherData>
     <CipherValue>You'll Have A Cipher Here.</CipherValue>
     </CipherData>
     </EncryptedData>
    </connectionStrings>
    </configuration>
    
    • You can now take the connectionStrings section and replace your cleartext version for your application.
    • Should you ever need to update your connectionStrings simply place the encrypted version back on your minimal web.config and run the Decrypt.bat (as administrator). This is what you should see:
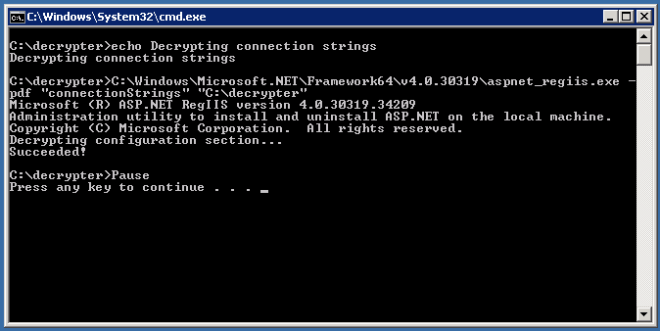
    de-example

    • You should then see your original clear text connection string. Hope this helps.
    • Things of note:
      • You can also do this with other sections of the web.config (just rename connectionStrings to whatever section you need to encrypt)
      • If you have comments inside of your connectionString the encryption and decryption will remove them.
      • Another reference: https://msdn.microsoft.com/en-us/library/zhhddkxy.aspx
    Help me out and share!

    • Email a link to a friend (Opens in new window) Email
    • Print (Opens in new window) Print
    • Share on LinkedIn (Opens in new window) LinkedIn
    • Share on Facebook (Opens in new window) Facebook
    • Share on X (Opens in new window) X
    • Share on Reddit (Opens in new window) Reddit
    • Share on Tumblr (Opens in new window) Tumblr
    • More
    • Share on Pinterest (Opens in new window) Pinterest
    • Share on Telegram (Opens in new window) Telegram
    • Share on WhatsApp (Opens in new window) WhatsApp
    Like Loading…

    +

    +

    +

    +

    +

    +

    + .Net, IIS, Programming, Web, XML
    + .Net, batch file, connection string, Decryption, Encryption, web application, web.config

    +

    +

    +

    +

    +

    +

    +

    +

    +

    +

    +

    +

  • Getting “Error: this template attempted to load component assembly Sitecore.Rocks.TemplateWizard…” ? Try this…

    12/23/2015

    +

    +

    +

    +

    +

    +

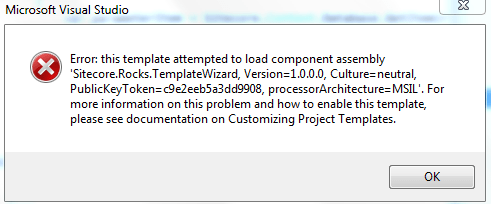
    At some point in your early Sitecore career you will likely encounter the following error:

    sitecorerockserror

    Perhaps you tried uninstalling and reinstalling Sitecore Rocks but still had the issue? Here’s what happened in my battle with troubleshooting.

    So I finally went and found the Sitecore.Rocks.TemplateWizard.dll and copied it to:

    C:\Program Files (x86)\Microsoft Visual Studio 12.0\Common7\IDE\PublicAssemblies
    

    If you have trouble finding where those assemblies are then look where the extension was installed. For me it was starting here

    C:\Users\username\AppData\Local\Microsoft\VisualStudio\12.0\Extensions
    

    Once there I browsed the directories until I found it.

    (Others I know have had to copy to Visual Studio 10 and 11 as well)

    These steps did fix the issue and allowed the template wizard to run when creating a layout.

    If you are still receiving other errors after this you may need to also bring in some other files. What was missing was a good number of other dlls:

    • Sitecore.Rocks.Validation.dll
    • Sitecore.Rocks.Validation.Runner.config.xml
    • Sitecore.Rocks.Validation.Runner.exe
    • Sitecore.Rocks.Validation.Runner.exe.config
    • Sitecore.Rocks.VisualStudio.dll
    • Sitecore.Rocks.VisualStudio.pkgdef
    • (and of course Sitecore.Rocks.TemplateWizard.dll)

    After copying these out to the folder mentioned above and restarting Visual Studio, my issue was resolved. Hope that helps.

    Help me out and share!

    • Email a link to a friend (Opens in new window) Email
    • Print (Opens in new window) Print
    • Share on LinkedIn (Opens in new window) LinkedIn
    • Share on Facebook (Opens in new window) Facebook
    • Share on X (Opens in new window) X
    • Share on Reddit (Opens in new window) Reddit
    • Share on Tumblr (Opens in new window) Tumblr
    • More
    • Share on Pinterest (Opens in new window) Pinterest
    • Share on Telegram (Opens in new window) Telegram
    • Share on WhatsApp (Opens in new window) WhatsApp
    Like Loading…

    +

    +

    +

    +

    +

    +

    + Sitecore, Sitecore Rocks, Troubleshooting, Visual Studio
    + assembly, Dll, Error, extension, plugin, sitecore, sitecore rocks, templatewizard, Visual Studio

    +

    +

    +

    +

    +

    +

    +

    +

    +

    +

    +

    +

  • Stuck On “Cannot Load php7apache2_4.dll into server: The specified module could not be found”? Try this…

    12/21/2015

    +

    +

    +

    +

    +

    +

    I recently just performed a PHP upgrade from 5.6.15 to 7.0.1. After doing everything I had suspected I needed to do I received this error in my logs when trying to start Apache:

    httpd.exe: Syntax error on line 569 of C:/Program Files (x86)/Apache Software Foundation/Apache24/conf/httpd.conf: Cannot load C:/Program Files (x86)/PHP.7.0.1/php7apache2_4.dll into server: The specified module could not be found.

    Here is what I had in that block, bolding the item in question:

    LoadModule php7_module "C:/Program Files (x86)/PHP.7.0.1/php7apache2_4.dll"
    AddHandler application/x-httpd-php .php
    PHPIniDir "C:/Program Files (x86)/PHP.7.0.1/"

    Huh??? I checked and double checked and that file was there. After about 2 hours of scratching my head I then found a forum post that clicked for me. You may not be recognizing the .dll file because it has a dependency on the Visual C++ Redistributable for Visual Studio 2015. Once I downloaded and installed the exe files (located here) then after another restart I started seeing my pages again. Hope it helps.

    Help me out and share!

    • Email a link to a friend (Opens in new window) Email
    • Print (Opens in new window) Print
    • Share on LinkedIn (Opens in new window) LinkedIn
    • Share on Facebook (Opens in new window) Facebook
    • Share on X (Opens in new window) X
    • Share on Reddit (Opens in new window) Reddit
    • Share on Tumblr (Opens in new window) Tumblr
    • More
    • Share on Pinterest (Opens in new window) Pinterest
    • Share on Telegram (Opens in new window) Telegram
    • Share on WhatsApp (Opens in new window) WhatsApp
    Like Loading…

    +

    +

    +

    +

    +

    +

    + Apache, PHP, Troubleshooting, Web
    + apache, C#, conf, Dll, HTTP, PHP

    +

    +

    +

    +

    +

    +

    +

    +

    +

    +

    +

    +

  • How To Make A SharePoint List System.String Column (Built From An BCS External Content Type List) Into A Clickable Hyperlink

    12/17/2015

    +

    +

    +

    +

    +

    +

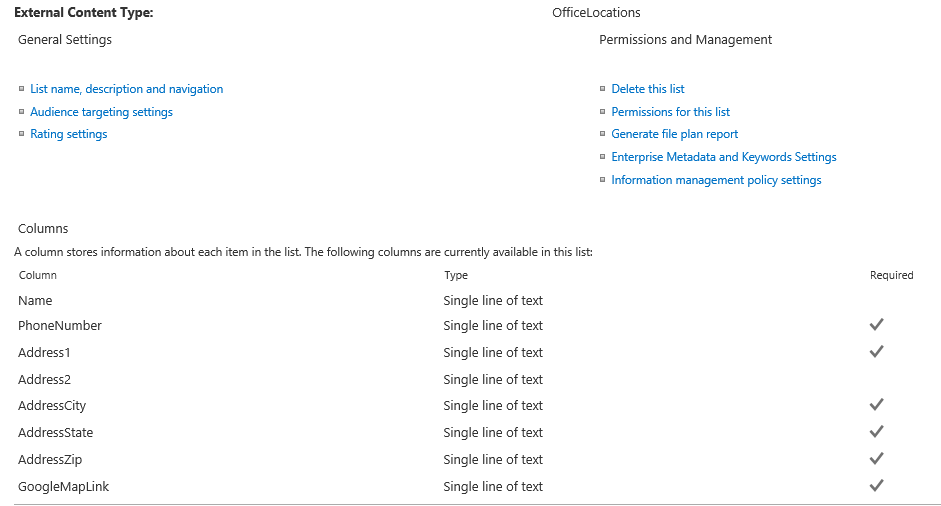
    So for this example I have a SQL database that I am pulling into an external content type called OfficeLocations. From this external content type I have created a SharePoint list that is referencing it. The issue I ran into is that the GoogleMapLink text coming from SQL was in a NVARCHAR format (which was System.String on the external content type and Single line of text for the column) and you cannot modify those columns.

    officelocationslistsetting

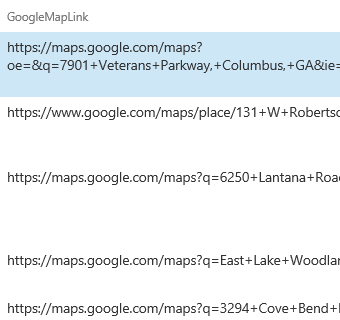
    This left me with a list that had a link but it was not clickable:

    officelocationslistsetting1

    Annoying right? So what do we do? Let’s mess with the XSL template of the item and see what happens…so I popped into SharePoint designer and created a view off of the SharePoint list and modified the XSL template of the GoogleMapLink column to use the string field as the href of the <a> tag and supplied my own text to give the link a more user friendly readable URL.

    To the code (the bolded elements are the only additions I made):

    <xsl:template name="FieldRef_Text_body.GoogleMapLink" ddwrt:dvt_mode="body" match ="FieldRef[@Name='GoogleMapLink']" mode="Text_body" ddwrt:ghost="hide">
     <xsl:param name="thisNode" select="."/>
     <xsl:variable name="currentValue" select="$thisNode/@*[name()=current()/@Name]" />
     <xsl:choose>
     <xsl:when test="@AutoHyperLink='TRUE'">
     <xsl:value-of select="$thisNode/@*[name()=current()/@Name]" disable-output-escaping ="yes"/>
     </xsl:when>
     <xsl:otherwise>
    <strong><xsl:element name="a"></strong>
    <strong> <xsl:attribute name="href"></strong>
     <xsl:value-of select="$thisNode/@*[name()=current()/@Name]"/>
    <strong> </xsl:attribute></strong>
    <strong> <xsl:text>Link</xsl:text></strong>
    <strong> </xsl:element></strong>
     </xsl:otherwise>
     </xsl:choose>
     </xsl:template>
    

    This created clickable links titled “Link” on the list itself. You can see the results below:

    officelocationslistsetting2

    Much cleaner, right? If you wanted the full link you could do that too. Hope that helps.

    Help me out and share!

    • Email a link to a friend (Opens in new window) Email
    • Print (Opens in new window) Print
    • Share on LinkedIn (Opens in new window) LinkedIn
    • Share on Facebook (Opens in new window) Facebook
    • Share on X (Opens in new window) X
    • Share on Reddit (Opens in new window) Reddit
    • Share on Tumblr (Opens in new window) Tumblr
    • More
    • Share on Pinterest (Opens in new window) Pinterest
    • Share on Telegram (Opens in new window) Telegram
    • Share on WhatsApp (Opens in new window) WhatsApp
    Like Loading…

    +

    +

    +

    +

    +

    +

    + BCS, SharePoint, SQL, XML
    + BCS, External Content Type, Link, List, SharePoint, web part, xml, XSL

    +

    +

    +

    +

    +

    +

    +

    +

    +

    +

    +

    +

Previous
1 … 8 9 10 11 12 … 14
Next

Linkedin

Tumblr

GitHub

Mastodon

Create a website or blog at WordPress.com

Loading Comments...
  • Subscribe Subscribed
    • @JaredMeredith
    • Join 75 other subscribers
    • Already have a WordPress.com account? Log in now.
    • @JaredMeredith
    • Subscribe Subscribed
    • Sign up
    • Log in
    • Report this content
    • View site in Reader
    • Manage subscriptions
    • Collapse this bar
%d