C#, Programming, SharePoint, Web

Convert Doc/Docx Files To PDF In SharePoint 2013 Using Word Automation Services (C#)

Most of you whom are searching around on this are aware of the solution for SharePoint 2010 (https://msdn.microsoft.com/en-us/library/office/ff181518(v=office.14).aspx). And chances are after you tried on your own to do this for 2013 that there was no List Definition type in VS, right? So after finding this (https://camerondwyer.wordpress.com/2013/09/20/how-to-create-a-custom-sharepoint-list-definition-using-visual-studio-2012/) I decided to frankenstein the old methods with the updated way to do it in Visual Studio. The results of the successful experiment are below.

Code It

This article describes the following steps to show how to call the Word Automation Services to convert a document:

  1. Creating a SharePoint 2013 Empty Project and Adding the SharePoint list.
  2. Adding a reference to the Microsoft.Office.Word.Server assembly.
  3. Adding an event receiver.
  4. Adding the sample code to the solution.

Creating a SharePoint 2013 List Definition (sort of) Application in Visual Studio 2012

This article uses a SharePoint 2013 list definition application for the sample code.

To create a SharePoint 2013 list definition application in Visual Studio 2012

  1. Start Microsoft Visual Studio 2012 as an administrator.
  2. In Visual Studio 2012 select File | New Project
  3. Select Templates | Visual C# | Office/SharePoint | SharePoint 2013 – Empty Project, Provide a name and location for the project/solution and OKcapture1-vsprojectName the project and solution something meaningful (ConvertWordToPDF perhaps?).
    To create the solution, click OK.
  4. Select a site to use for debugging and deployment.
  5. Select the site to use for debugging and the trust level for the SharePoint solution.
    Note
    Make sure to select the trust level Deploy as a farm solution. If you deploy as a sandboxed solution, it does not work because the solution uses the Microsoft.Office.Word.Server assembly. This assembly does not allow for calls from partially trusted callers.
  6. To finish creating the solution, click Finish.
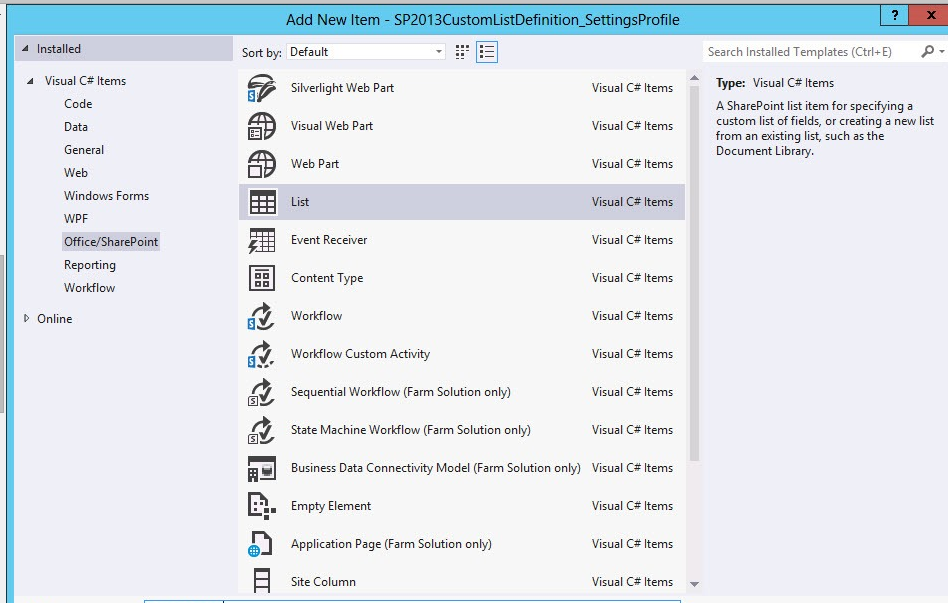
  7. Once the new solution has been created, we can use the new Visual Designer to create the List Definition. Right click the project in the solution explorer and select Add | New Item
  8. Select Visual C# Items | Office/SharePoint | List, provide a name and click OK
  9. Provide a display name for the list. Go with the “Create a customizable list template and a list instance of it” and choose the Document Library.

Adding a Reference to the Microsoft Office Word Server Assembly

To use Word Automation Services, you must add a reference to the Microsoft.Office.Word.Server to the solution.

To add a reference to the Microsoft Office Word Server Assembly

  1. In Visual Studio, from the Project menu, select Add Reference.
  2. Locate the assembly. By using the Browse tab, locate the assembly. The Microsoft.Office.Word.Server assembly is located in the SharePoint 2013 ISAPI folder. This is usually located at c:\Program Files\Common Files\Microsoft Shared\Web Server Extensions\15\ISAPI\. After the assembly is located, click OK to add the reference.

Adding an Event Receiver

This article uses an event receiver that uses the Microsoft.Office.Word.Server assembly to create document conversion jobs and add them to the Word Automation Services conversion job queue.

To add an event receiver

  1. In Visual Studio, on the Project menu, click Add New Item.
  2. In the Add New Item dialog box, in the Project Templates pane, click the Visual C# SharePoint 2013 template.
  3. In the Templates pane, click Event Receiver.
  4. Name the event receiver ConvertWordToPDFEventReceiver and then click Add.
    The event receiver converts Word Documents after they are added to the List. Select the An item was added item from the list of events that can be handled.
  5. Click Finish to add the event receiver to the project.

Adding the Sample Code to the Solution

Replace the contents of the ConvertWordToPDFEventReceiver.cs source file with the following code. Just remember to make sure you replace “Word Automation Services” with the name of it in the web applications in central admin.

using System;
using System.Security.Permissions;
using Microsoft.SharePoint;
using Microsoft.SharePoint.Security;
using Microsoft.SharePoint.Utilities;
using Microsoft.SharePoint.Workflow;

using Microsoft.Office.Word.Server.Conversions;

namespace ConvertWordToPDF.ConvertWordToPDFEventReceiver
{
  /// <summary>
  /// List Item Events
  /// </summary>
  public class ConvertWordToPDFEventReceiver : SPItemEventReceiver
  {
    /// <summary>
    /// An item was added.
    /// </summary>
    public override void ItemAdded(SPItemEventProperties properties)
    {
      base.ItemAdded(properties);

      // Verify the document added is a Word document
      // before starting the conversion.
      if (properties.ListItem.Name.Contains(".docx") 
        || properties.ListItem.Name.Contains(".doc"))
      {
        //Variables used by the sample code.
        ConversionJobSettings jobSettings;
        ConversionJob pdfConversion;
        string wordFile;
        string pdfFile;

        // Initialize the conversion settings.
        jobSettings = new ConversionJobSettings();
        jobSettings.OutputFormat = SaveFormat.PDF;

        // Create the conversion job using the settings.
        pdfConversion = 
          new ConversionJob("Word Automation Services", jobSettings);

        // Set the credentials to use when running the conversion job.
        pdfConversion.UserToken = properties.Web.CurrentUser.UserToken;

        // Set the file names to use for the source Word document
        // and the destination PDF document.
        wordFile = properties.WebUrl + "/" + properties.ListItem.Url;
        if (properties.ListItem.Name.Contains(".docx"))
        {
          pdfFile = wordFile.Replace(".docx", ".pdf");
        }
        else
        {
          pdfFile = wordFile.Replace(".doc", ".pdf");
        }

        // Add the file conversion to the conversion job.
        pdfConversion.AddFile(wordFile, pdfFile);

        // Add the conversion job to the Word Automation Services 
        // conversion job queue. The conversion does not occur
        // immediately but is processed during the next run of
        // the document conversion job.
        pdfConversion.Start();

      }
    }
  }
}

Deploy and enjoy!

Programming, Sitecore

Encrypt And Decrypt A Sitecore ConnectionStrings.Config File

Encrypting .Net application web.config files are easy enough. However Sitecore is NOT a fan of you messing with the web.config. This is even part of the reason the connection strings are stored out into a separate file in Sitecore. I’ll go through a quick method of taking care of doing it on the separate Sitecore file.

  • Ensure you have .Net framework installed where you are going to perform the encryption (my examples are 4.0, you can use 2.0 if need be)
  • !!!IMPORTANT!!! Make a backup of your Sitecore ConnectionStrings.config file
  • Create a folder on C: to hold your encrypt/decrypt batch files (example will be C:\decrypter) where the .Net framework exists
  • Open notepad and create a batch file (encrypt.bat), put the following in for your encryption statement and then save it to your folder you just created
echo Encrypting app_config/connectionstrings.config
 C:\Windows\Microsoft.NET\Framework64\v4.0.30319\aspnet_regiis.exe -pef "connectionStrings" "C:\decrypter"
 Pause
  • Repeat this step for the decryption statement (decrypt.bat)
echo Encrypting app_config/connectionstrings.config
 C:\Windows\Microsoft.NET\Framework64\v4.0.30319\aspnet_regiis.exe -pdf "connectionStrings" "C:\decrypter"
 Pause
  • Create a blank web.config (THIS IS YOUR WEB.CONFIG YOU MADE AND NOT THE SITECORE WEB.CONFIG!!!), put and wrap your Sitecore connection strings (from ConnectionStrings.config) inside and save it to the folder you created. it should look something like:
<?xml version="1.0" encoding="utf-8"?>
 <configuration>
 <connectionStrings>
 <add name="core" connectionString="user id=sitecoreuser;password=sitecorepw;Data Source=servernameorip;Database=Sitecore_Core" />
 <add name="master" connectionString="user id=sitecoreuser;password=sitecorepw;Data Source=servernameorip;Database=Sitecore_Master" />
 <add name="web" connectionString="user id=sitecoresql;password=sitecorepw;Data Source=servernameorip;Database=Sitecore_Web" />
 <add name="reporting" connectionString="user id=sitecoresql;password=sitecorepw;Data Source=servernameorip;Database=Sitecore_Analytics" />
 </connectionStrings>
 </configuration>
  •  Once you have both batch files and the web.config then run the encrypt batch file as an administrator. It will look something like this:

encrypt

  • You’ll then have a web.config in your folder now similar to this:
<?xml version="1.0" encoding="utf-8"?>
<configuration>
<connectionStrings configProtectionProvider="RsaProtectedConfigurationProvider">
<EncryptedData Type="http://www.w3.org/2001/04/xmlenc#Element"
xmlns="http://www.w3.org/2001/04/xmlenc#">
<EncryptionMethod Algorithm="http://www.w3.org/2001/04/xmlenc#tripledes-cbc" />
<KeyInfo xmlns="http://www.w3.org/2000/09/xmldsig#">
<EncryptedKey xmlns="http://www.w3.org/2001/04/xmlenc#">
<EncryptionMethod Algorithm="http://www.w3.org/2001/04/xmlenc#rsa-1_5" />
<KeyInfo xmlns="http://www.w3.org/2000/09/xmldsig#">
<KeyName>Rsa Key</KeyName>
</KeyInfo>
<CipherData>
<CipherValue>(you'll have a long cipher here)</CipherValue>
</CipherData>
</EncryptedKey>
</KeyInfo>
<CipherData>
<CipherValue>(you'll have a long cipher here)</CipherValue>
</CipherData>
</EncryptedData>
</connectionStrings>
</configuration>
  • Once completed take the connectionStrings section of the web.config and replace your ConnectionStrings.config file with the encrypted connectionStrings section (run notepad in admin mode if your sitecore is in the web root).
  • Recycle the app pool to refresh. You should now be encrypted!
  • If this fails for you at some point then replace your Sitecore connectionStrings.config file with the backup you took at the start.
  • And yes, to decrypt (to update your strings) put your encrypted connectionstrings section in your web.config (THIS IS YOUR WEB.CONFIG YOU MADE AND NOT THE SITECORE WEB.CONFIG!!!) in the windows folder you made and run the decrypt.bat as an admin. You should get:

decrypt

Again, I hope this helps someone. Questions and comments are always welcome! And for the sake of hoping I catch the skimmers here, DO NOT MODIFY THE SITECORE WEB.CONFIG. DO THIS ON THE CONNECTIONSTRINGS.CONFIG! You have been warned…

API, C#, Programming, SMS, Web Service

C# Send A SMS Text Message Programmatically Using Clickatell HTTP API

I would start off by heading here to better understand the Clickatell HTTP API: https://www.clickatell.com/apis-scripts/apis/http-s/. If you are interested they allow you 10 free text messages to try it out before you buy a package. Just sign up for an account and create your HTTP API and use your information to populate the snippet below.

For a particular project I am using this API to send out texts for verification purposes. I am using my method inside of a web service to send the information about a user as well as their pre-generated pin. Of course it is a lot different in my project but I am providing the bare bones below.

If you are a skimmer and you skipped reading anything I said above then here you go:

Code for MyWebRequest class:

using System;
using System.Collections.Generic;
using System.Linq;
using System.Web;
using System.Net;
using System.IO;
using System.Text;
using System.Configuration;

namespace CustomWebServices
{
public class MyWebRequest
{
private WebRequest request;
private Stream dataStream;

private string status;

public String Status
{
get
{
return status;
}
set
{
status = value;
}
}

public MyWebRequest(string url)
{
// Create a request using a URL that can receive a post.

request = WebRequest.Create(url);
}

public MyWebRequest(string url, string method)
: this(url)
{

if (method.Equals("GET") || method.Equals("POST"))
{
// Set the Method property of the request to POST.
request.Method = method;
}
else
{
throw new Exception("Invalid Method Type");
}
}

public MyWebRequest(string url, string method, string data)
: this(url, method)
{

// Create POST data and convert it to a byte array.
string postData = data;
byte[] byteArray = Encoding.UTF8.GetBytes(postData);

// Set the ContentType property of the WebRequest.
request.ContentType = "application/x-www-form-urlencoded";

// Set the ContentLength property of the WebRequest.
request.ContentLength = byteArray.Length;

// Get the request stream.
dataStream = request.GetRequestStream();

// Write the data to the request stream.
dataStream.Write(byteArray, 0, byteArray.Length);

// Close the Stream object.
dataStream.Close();

}

public string GetResponse()
{
// Get the original response.
WebResponse response = request.GetResponse();

this.Status = ((HttpWebResponse)response).StatusDescription;

// Get the stream containing all content returned by the requested server.
dataStream = response.GetResponseStream();

// Open the stream using a StreamReader for easy access.
StreamReader reader = new StreamReader(dataStream);

// Read the content fully up to the end.
string responseFromServer = reader.ReadToEnd();

// Clean up the streams.
reader.Close();
dataStream.Close();
response.Close();

return responseFromServer;
}
}
}

And now the code for the method itself:

public string SendText(string mobile, string pin)
{
// Make sure to add the country code to ensure the text goes through
string phoneCheck = "";
if (mobile.Length == 10)
{
phoneCheck = "1" + mobile;
}
// Clickatell settings
string textmessage = "Your verification pin is " + pin;
string parameters = "";
parameters = "user=yourclickatellusername";
parameters = parameters + "&amp;password=yourclickatellpassword";
parameters = parameters + "&amp;api_id=youruniqueclickatellhttpapiid";
parameters = parameters + "&amp;to=" + phoneCheck;
parameters = parameters + "&amp;text=" + textmessage;
parameters = parameters + "&amp;mo=1";
parameters = parameters + "&amp;from=15558675309";
MyWebRequest myRequest = new MyWebRequest("<a href="http://api.clickatell.com/http/sendmsg">http://api.clickatell.com/http/sendmsg</a>", "POST", parameters);
myRequest.GetResponse();
} // SendText

* Note: If you put this call on a server that will require a proxy then add it to your MyWebRequest class

Active Directory, C#, Certificates, Programming

Programmatically Install A Root CA Certificate So Users Don’t Have To (C#)

So here’s the backstory: I received the task of improving certificate enrollment so that users can

1) Be verified via username, password, captcha & verification pin

2) Auto Enroll without an external approval

3) Simplify the process

As some of you already know, ADCS via web enrollment is…how can we say…dated. So I wrote an application that sits in front of ADCS to first verify the user. Once they are through then the web enrollment is configured to let them run the wizard through to installing their cert. The issue that came to me is that most end-users will not take the time to ensure the root CA makes it to the trusted store (thus giving the classic CA cert is not installed message). So I received the order from on-high to “do it for them”. At first I struggled, attempting to understand how this could be done. I spoke with Microsoft and as I already was aware they indicated that having the user choose the trusted root store for the CA is by design. So what to do…ah I know, let’s just script it out.

So this is as simple as it gets. Download the cert, store it on the local drive and use the built-in certmgr.exe to perform the root CA to trusted store installation. Here it is (this code is just one a basic console app):

Code:

using System.Security.Cryptography.X509Certificates;

WebClient webClient = new WebClient();
webClient.DownloadFile("https://yourserver.domain.com/CertSrv/certnew.cer?ReqID=CACert&amp;Renewal=0&amp;Mode=inst&amp;Enc=b64", @"C:\Temp\certnew.cer");

X509Store store = new X509Store(StoreName.Root,
StoreLocation.LocalMachine);
store.Open(OpenFlags.ReadWrite);
X509Certificate2Collection collection = new X509Certificate2Collection();
X509Certificate2 cert = new X509Certificate2(@"C:\Temp\certnew.cer");
byte[] encodedCert = cert.GetRawCertData();
Console.WriteLine("We are now installing the CA certificate into the Trusted Root Certificate store ...");
store.Add(cert);
Console.WriteLine("Done! The CA certificate was successfully. Press any key to close.");
Console.ReadKey();
store.Close();

This finishes the root CA portion so they can fly through the rest of web enrollment. Hope this helps.

C#, Oracle, Programming, SQL

Execute An Oracle Stored Procedure With Parameters (C#)

So you want to execute an Oracle stored procedure with parameters, huh? For this example I have an Oracle stored procedure called MEMBER_TYPE_UPDATE that will update what type of membership I have based on the numeric value. This sort of snippet can be used in a web application directly or called by some form of web service.

Here are some example values:

0 = Not a member

1 = Member

2 = Member with first tier privileges

3 = Member with highest level privileges

The update occurs based on their username and based on that username will attempt to update the numeric value. So below we will be calling a method (passing the two parameters to update with). I will then gather the connection string to Oracle and begin to execute my Oracle stored procedure (while giving it the values passed into the method to be used in the stored procedure).

Here’s my snippet:

using System;
using System.Data;
using System.Web.Services;
using Oracle.DataAccess.Client;
using System.Configuration;

public string SetUserMembership(string membershipNetworkUserName, int membershipStatusValue)
{
string errorString = string.Empty;
OracleCommand cmd = null;
try
{

string connectionString = string.Empty;
if (ConfigurationManager.AppSettings["location"].Contains("PROD"))
{
connectionString = ConfigurationManager.ConnectionStrings["ConnectionStringPROD"].ConnectionString;
}
else
{
connectionString = ConfigurationManager.ConnectionStrings["ConnectionStringDEV"].ConnectionString;
}

cmd = new OracleCommand();
cmd.Connection = new OracleConnection(connectionString);
cmd.CommandType = CommandType.StoredProcedure;
cmd.CommandText = "ORACLE_USER.MEMBER_TYPE_UPDATE";
cmd.Parameters.Add("in_employeeUserName", OracleDbType.Varchar2).Value = membershipNetworkUserName;
cmd.Parameters.Add("in_status_id", OracleDbType.Decimal).Value = membershipStatusValue;
cmd.Parameters.Add("O_RETURN_STATUS", OracleDbType.Varchar2, 4000).Direction = ParameterDirection.Output;
cmd.Connection.Open();
cmd.ExecuteNonQuery();

string returnString = cmd.Parameters["O_RETURN_STATUS"].Value.ToString();
if (!returnString.Contains("SUCCESS"))
{
// obviously there was an issue and we want to display this somewhere
errorString = returnString;
}
}

For a specific call I would call it with SetUserMembership(“username”, “2”);

Ideally you would have variables there. Hope this helps people to see the parameters in use.