IIS, SharePoint, Troubleshooting

Help! Need Help Diagnosing A 500 Errors In SharePoint? Try This…

Imagine the nightmare…you decided to sneak in a web part deployment in right before the start of the business day. Right after your deployment you see that the site is about to come back up…and…then nothing. A blank screen. In desperation you open Internet Explorer to try and see if it loads there as well..nothing but a 500 error. Then, the feeling rushes over you that this was a very bad decision. While we should address why you were doing an early morning deployment we shall spare you. 🙂 So what do you do now?

One of the best ways to see what is going on with a 500 error is to enabled Failed Request Tracing in IIS for the web site in question. Once enabled you can replicate the issue by refreshing the browser a few times; this should be more than enough to capture a few. Once captured then you will usually see where the issue is identified (especially with web.config changes that happen).

To do this:

1) Open IIS

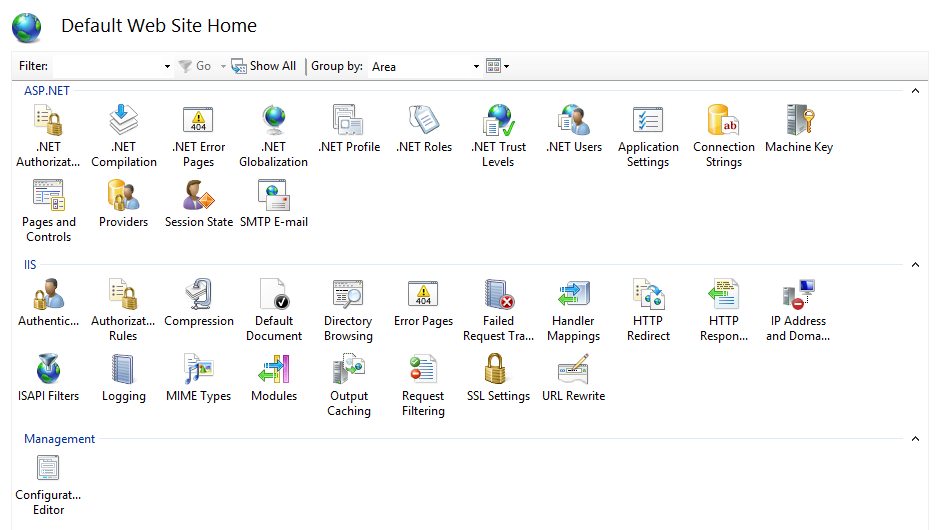
2) Select the web site in question and open the Features View

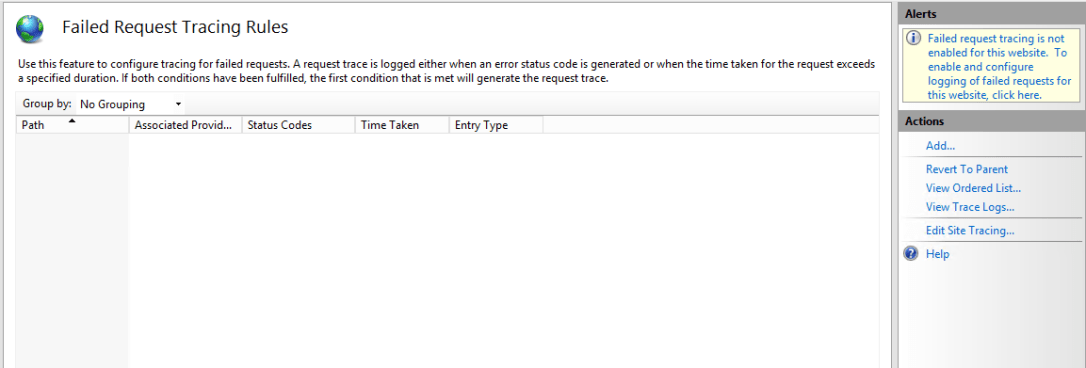
3) Under the IIS section select “Failed Request Tracing” by double-clicking it

FRT1

4) In the top right hand corner click the message in the Alerts section

FRT2

5) When the pop-up comes up then select to enable and take the default directory (unless you need it elsewhere, then specify another location) and hit OK

FR3

6) Next, under actions select “Add…” and select “All content (*)” and click Next

FRT4

7) Indicate the status code of 500 (and others where applicable) and click next again

Frt5

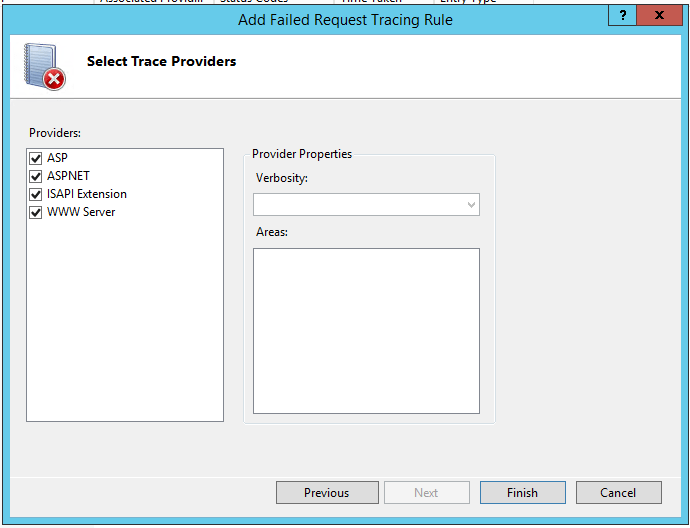
8) Indicate your trace providers and click Finish

FRT6

You should now see your created Failed Request Tracing Rules.

FRT7

Now go and refresh the browser a couple times to see your error again. Once that is logged then go to the trace logs. To find that location go back to the site in features view, select Failed Request Tracing and select “View Trace Logs…”

FR8

Double click to view the recorded log (you can use IE):

FRT9

Viewing these should at least help to identify the obvious when it is a line in the web.config or when there has been a setting changed as a result of saving a configuration option in SharePoint (or 3rd party products or web parts in SharePoint). Hope this helps, happy troubleshooting. Questions are always welcome.


BCS, SharePoint, SQL, XML

How To Make A SharePoint List System.String Column (Built From An BCS External Content Type List) Into A Clickable Hyperlink

So for this example I have a SQL database that I am pulling into an external content type called OfficeLocations. From this external content type I have created a SharePoint list that is referencing it. The issue I ran into is that the GoogleMapLink text coming from SQL was in a NVARCHAR format (which was System.String on the external content type and Single line of text for the column) and you cannot modify those columns.

officelocationslistsetting

This left me with a list that had a link but it was not clickable:

officelocationslistsetting1

Annoying right? So what do we do? Let’s mess with the XSL template of the item and see what happens…so I popped into SharePoint designer and created a view off of the SharePoint list and modified the XSL template of the GoogleMapLink column to use the string field as the href of the <a> tag and supplied my own text to give the link a more user friendly readable URL.

To the code (the bolded elements are the only additions I made):

<xsl:template name="FieldRef_Text_body.GoogleMapLink" ddwrt:dvt_mode="body" match ="FieldRef[@Name='GoogleMapLink']" mode="Text_body" ddwrt:ghost="hide">
 <xsl:param name="thisNode" select="."/>
 <xsl:variable name="currentValue" select="$thisNode/@*[name()=current()/@Name]" />
 <xsl:choose>
 <xsl:when test="@AutoHyperLink='TRUE'">
 <xsl:value-of select="$thisNode/@*[name()=current()/@Name]" disable-output-escaping ="yes"/>
 </xsl:when>
 <xsl:otherwise>
<strong><xsl:element name="a"></strong>
<strong> <xsl:attribute name="href"></strong>
 <xsl:value-of select="$thisNode/@*[name()=current()/@Name]"/>
<strong> </xsl:attribute></strong>
<strong> <xsl:text>Link</xsl:text></strong>
<strong> </xsl:element></strong>
 </xsl:otherwise>
 </xsl:choose>
 </xsl:template>

This created clickable links titled “Link” on the list itself. You can see the results below:

officelocationslistsetting2

Much cleaner, right? If you wanted the full link you could do that too. Hope that helps.

C#, Programming, SharePoint, Web

Convert A Links List To A DropDownList By A Web Part In SharePoint 2013 (C#)

So I have been enjoying the benefit of Mike Smith’s article for a while now (http://techtrainingnotes.blogspot.com/2010/12/sharepoint-convert-links-list-to.html). A client I did a project for was wanting to carry this functionality forward to 2013. The problem: this method didn’t work in 2013.

So I took a programmatic approach to lose the JavaScript dependency. It also will sort the dropdown names by what you type as the description by using the sortedlist in the code behind. It’s fairly simple, here’s what I did:

  • Created a links list and populated some URLs and Descriptions (!!! You need both for below to work, otherwise remove the description dependency in my code !!!)
  • Create a SharePoint 2013 Visual Web Part project
  • Add the dropdownlist control to the control

In the .ascx control I have:

<asp:DropDownList ID="linkDropDown" runat="server" Font-Names="Arial" Font-Size="10pt"
Width="300px" OnSelectedIndexChanged="linkDropDown_SelectedIndexChanged" AutoPostBack="true" EnableViewState="true">
<asp:ListItem Text="Link to ..." Value="#"></asp:ListItem>
</asp:DropDownList>
  • Add the code to the code behind of the control

Now the code behind, here’s my using statements:

using System;
using System.ComponentModel;
using System.Web.UI.WebControls.WebParts;
using Microsoft.SharePoint;
using System.Collections;
using System.Web.UI;
using System.Web.UI.HtmlControls;
using System.Web.UI.WebControls;

and here is what I have in the Page_Load and the SelectedIndexChanged event

protected void linkDropDown_SelectedIndexChanged(object sender, EventArgs e)
{
Context.Response.Redirect(linkDropDown.SelectedValue.ToString());
}

protected void Page_Load(object sender, EventArgs e)
{
SortedList sortedLists = new SortedList();

using (SPSite siteCol = new SPSite("http://mysharepoint2013site/"))
{
using (SPWeb web = siteCol.RootWeb)
{
SPList list = web.GetList("/Lists/NameOfLinksList");
SPListItemCollection items = list.GetItems();

foreach (SPListItem it in items)
{
SPFieldUrlValue fieldValue = new SPFieldUrlValue(it["URL"].ToString());
string description = fieldValue.Description;
string url = fieldValue.Url;
sortedLists.Add(description, url);
}
}

IDictionaryEnumerator enumerator = sortedLists.GetEnumerator();
while (enumerator.MoveNext())
{
ListItem listitem = new ListItem();
listitem.Text = enumerator.Key.ToString();
listitem.Value = enumerator.Value.ToString();
linkDropDown.Items.Add(new ListItem(listitem.Text.ToString(), listitem.Value.ToString()));
}
}

Deploy and enjoy!

C#, Programming, SharePoint, Web

Convert Doc/Docx Files To PDF In SharePoint 2013 Using Word Automation Services (C#)

Most of you whom are searching around on this are aware of the solution for SharePoint 2010 (https://msdn.microsoft.com/en-us/library/office/ff181518(v=office.14).aspx). And chances are after you tried on your own to do this for 2013 that there was no List Definition type in VS, right? So after finding this (https://camerondwyer.wordpress.com/2013/09/20/how-to-create-a-custom-sharepoint-list-definition-using-visual-studio-2012/) I decided to frankenstein the old methods with the updated way to do it in Visual Studio. The results of the successful experiment are below.

Code It

This article describes the following steps to show how to call the Word Automation Services to convert a document:

  1. Creating a SharePoint 2013 Empty Project and Adding the SharePoint list.
  2. Adding a reference to the Microsoft.Office.Word.Server assembly.
  3. Adding an event receiver.
  4. Adding the sample code to the solution.

Creating a SharePoint 2013 List Definition (sort of) Application in Visual Studio 2012

This article uses a SharePoint 2013 list definition application for the sample code.

To create a SharePoint 2013 list definition application in Visual Studio 2012

  1. Start Microsoft Visual Studio 2012 as an administrator.
  2. In Visual Studio 2012 select File | New Project
  3. Select Templates | Visual C# | Office/SharePoint | SharePoint 2013 – Empty Project, Provide a name and location for the project/solution and OKcapture1-vsprojectName the project and solution something meaningful (ConvertWordToPDF perhaps?).
    To create the solution, click OK.
  4. Select a site to use for debugging and deployment.
  5. Select the site to use for debugging and the trust level for the SharePoint solution.
    Note
    Make sure to select the trust level Deploy as a farm solution. If you deploy as a sandboxed solution, it does not work because the solution uses the Microsoft.Office.Word.Server assembly. This assembly does not allow for calls from partially trusted callers.
  6. To finish creating the solution, click Finish.
  7. Once the new solution has been created, we can use the new Visual Designer to create the List Definition. Right click the project in the solution explorer and select Add | New Item
  8. Select Visual C# Items | Office/SharePoint | List, provide a name and click OK
  9. Provide a display name for the list. Go with the “Create a customizable list template and a list instance of it” and choose the Document Library.

Adding a Reference to the Microsoft Office Word Server Assembly

To use Word Automation Services, you must add a reference to the Microsoft.Office.Word.Server to the solution.

To add a reference to the Microsoft Office Word Server Assembly

  1. In Visual Studio, from the Project menu, select Add Reference.
  2. Locate the assembly. By using the Browse tab, locate the assembly. The Microsoft.Office.Word.Server assembly is located in the SharePoint 2013 ISAPI folder. This is usually located at c:\Program Files\Common Files\Microsoft Shared\Web Server Extensions\15\ISAPI\. After the assembly is located, click OK to add the reference.

Adding an Event Receiver

This article uses an event receiver that uses the Microsoft.Office.Word.Server assembly to create document conversion jobs and add them to the Word Automation Services conversion job queue.

To add an event receiver

  1. In Visual Studio, on the Project menu, click Add New Item.
  2. In the Add New Item dialog box, in the Project Templates pane, click the Visual C# SharePoint 2013 template.
  3. In the Templates pane, click Event Receiver.
  4. Name the event receiver ConvertWordToPDFEventReceiver and then click Add.
    The event receiver converts Word Documents after they are added to the List. Select the An item was added item from the list of events that can be handled.
  5. Click Finish to add the event receiver to the project.

Adding the Sample Code to the Solution

Replace the contents of the ConvertWordToPDFEventReceiver.cs source file with the following code. Just remember to make sure you replace “Word Automation Services” with the name of it in the web applications in central admin.

using System;
using System.Security.Permissions;
using Microsoft.SharePoint;
using Microsoft.SharePoint.Security;
using Microsoft.SharePoint.Utilities;
using Microsoft.SharePoint.Workflow;

using Microsoft.Office.Word.Server.Conversions;

namespace ConvertWordToPDF.ConvertWordToPDFEventReceiver
{
  /// &lt;summary&gt;
  /// List Item Events
  /// &lt;/summary&gt;
  public class ConvertWordToPDFEventReceiver : SPItemEventReceiver
  {
    /// &lt;summary&gt;
    /// An item was added.
    /// &lt;/summary&gt;
    public override void ItemAdded(SPItemEventProperties properties)
    {
      base.ItemAdded(properties);

      // Verify the document added is a Word document
      // before starting the conversion.
      if (properties.ListItem.Name.Contains(".docx") 
        || properties.ListItem.Name.Contains(".doc"))
      {
        //Variables used by the sample code.
        ConversionJobSettings jobSettings;
        ConversionJob pdfConversion;
        string wordFile;
        string pdfFile;

        // Initialize the conversion settings.
        jobSettings = new ConversionJobSettings();
        jobSettings.OutputFormat = SaveFormat.PDF;

        // Create the conversion job using the settings.
        pdfConversion = 
          new ConversionJob("Word Automation Services", jobSettings);

        // Set the credentials to use when running the conversion job.
        pdfConversion.UserToken = properties.Web.CurrentUser.UserToken;

        // Set the file names to use for the source Word document
        // and the destination PDF document.
        wordFile = properties.WebUrl + "/" + properties.ListItem.Url;
        if (properties.ListItem.Name.Contains(".docx"))
        {
          pdfFile = wordFile.Replace(".docx", ".pdf");
        }
        else
        {
          pdfFile = wordFile.Replace(".doc", ".pdf");
        }

        // Add the file conversion to the conversion job.
        pdfConversion.AddFile(wordFile, pdfFile);

        // Add the conversion job to the Word Automation Services 
        // conversion job queue. The conversion does not occur
        // immediately but is processed during the next run of
        // the document conversion job.
        pdfConversion.Start();

      }
    }
  }
}

Deploy and enjoy!