Skip to content

@JaredMeredith

Learn. Share. Repeat.

Contact

  • Blog
  • About Me
  • Strengths Finder Top 5
    • Strengths Finder All 34
  • 16Peronalities
  • Builder Profile 10
  • Four Lessons about Facing Adversity as a New Employee

    08/10/2017

    +

    +

    +

    +

    +

    +

    When I first set out to write this I was not sure where it was going to end up. I just knew that the experiences that I have had through the years just could not be brushed off without someone gaining a valuable lesson from someone else’s story. That’s what I hope this does and I believe that if you will apply these things to your own life you will grow as a person and in your career to move forward.

    So the backstory: 6 months into a new job. I now have just enough time under my belt not to be the “new guy” and enough wins and deployments to have an opinion that matters amongst the team…well, most of the team. There were a couple holdouts that simply could not believe a new guy out of school could pick up some things so quickly and be acclimated to the norm. As I sat in a traditional project staff meeting I volunteered to participate in an upcoming project of great complexity to do some development that had not been done before at that time. No sooner than I had signed myself up one of my colleagues emphatically challenged me by saying, “Just because you think you can do one or two really easy things doesn’t make you a senior analyst nor qualifies you to work on high priority projects”. I still can remember the hush in the room that day. I quickly reacted and followed that with, “Well, I understand your opinion but would like the chance to participate and to prove my abilities and will hope to show you that I can be a contributor to the project”.

    So what did I learn from this experience?

    Four Lessons about Facing Adversity as a new Employee:

    1) In any new job or responsibility you will be challeneged on your capability. This is expected and should be welcomed as an opportunity for you to show how you can contribute with your strengths and abilities.

    2) When you are challenged by others about your abilities you need to respond with your willingness to step up to the challenge. Being challenged does not mean you should run away from adversity. Strive forward to be the first in line to say, “Yes, I want to be a part of change”

    3) Mistakes are often made when people get too deep into the weeds when arguing in the details of things to prove their knowledge; remember that everyone in the room has to grow in their understanding and will fail and make mistakes as well. Be patient and remember it is about the working relationship and the details.

    4) Showing your resolve will allow others to see a resounding confidence and ability to accept diversity and capability to move forward. The greater you continue to build your confidence the greater you will build relationships and trust with your business and colleagues. 

    So the moral of this story? In the end I not only took the additional responsibility on this project but eventually became the lead over it. As a result of its success I received a raise, a promotion and other opportunities with other projects that I would have been passed over on previously (had I backed down from the previous adversity I received). Most notably I am happy to say that out of that experience it help me to grow to respect and work well with the colleague who challenged me.

    Remember to continue to believe in your confidence, trust your abilities, build the relationships with others and you will begin to see results start working greater for your good.

    More to come, hope this was helpful.


    Help me out and share!

    • Email a link to a friend (Opens in new window) Email
    • Print (Opens in new window) Print
    • Share on LinkedIn (Opens in new window) LinkedIn
    • Share on Facebook (Opens in new window) Facebook
    • Share on X (Opens in new window) X
    • Share on Reddit (Opens in new window) Reddit
    • Share on Tumblr (Opens in new window) Tumblr
    • More
    • Share on Pinterest (Opens in new window) Pinterest
    • Share on Telegram (Opens in new window) Telegram
    • Share on WhatsApp (Opens in new window) WhatsApp

    Like this:

    Like Loading…

    +

    +

    +

    +

    +

    +

    + Blog, Web
    + adversity, employee, lessons

    +

    +

    +

    +

    +

    +

    +

    +

    +

    +

    +

    +

  • Export SharePoint Users and Properties from a specific Site Collection into a CSV file via PowerShell

    08/10/2017

    +

    +

    +

    +

    +

    +

    Wanted to provide a very helpful PowerShell snippet that I have used on multiple SharePoint farms to pull a list of users and their properties that can be exported out to a CSV file.

    Simply update the snippet with your site collection URL and file path/name and you’ll be good to go!

    [sourcecode]
    $siteUrl = "http://yoursharepointsite"
    $outputFile = "c:\filepath\yourfilehere.csv"

    Add-PSSnapin Microsoft.SharePoint.PowerShell -ErrorAction SilentlyContinue
    $serviceContext = Get-SPServiceContext -Site $siteUrl
    $profileManager = New-Object Microsoft.Office.Server.UserProfiles.UserProfileManager($serviceContext);
    $profiles = $profileManager.GetEnumerator()

    $fields = @(
    "SID",
    "ADGuid",
    "AccountName",
    "FirstName",
    "LastName",
    "PreferredName",
    "WorkPhone",
    "Office",
    "Department",
    "Title",
    "Manager",
    "AboutMe",
    "UserName",
    "SPS-Skills",
    "SPS-School",
    "SPS-Dotted-line",
    "SPS-Peers",
    "SPS-Responsibility",
    "SPS-PastProjects",
    "SPS-Interests",
    "SPS-SipAddress",
    "SPS-HireDate",
    "SPS-Location",
    "SPS-TimeZone",
    "SPS-StatusNotes",
    "Assistant",
    "WorkEmail",
    "SPS-ClaimID",
    "SPS-ClaimProviderID",
    "SPS-ClaimProviderType",
    "CellPhone",
    "Fax",
    "HomePhone",
    "PictureURL"
    )

    $collection = @()

    foreach ($profile in $profiles) {
    $user = "" | select $fields
    foreach ($field in $fields) {
    if($profile[$field].Property.IsMultivalued) {
    $user.$field = $profile[$field] -join "|"
    } else {
    $user.$field = $profile[$field].Value
    }
    }
    $collection += $user
    }

    $collection | Export-Csv $outputFile -NoTypeInformation
    $collection | Out-GridView
    [/sourcecode]

    Hope this helps, questions are welcome.

    Help me out and share!

    • Email a link to a friend (Opens in new window) Email
    • Print (Opens in new window) Print
    • Share on LinkedIn (Opens in new window) LinkedIn
    • Share on Facebook (Opens in new window) Facebook
    • Share on X (Opens in new window) X
    • Share on Reddit (Opens in new window) Reddit
    • Share on Tumblr (Opens in new window) Tumblr
    • More
    • Share on Pinterest (Opens in new window) Pinterest
    • Share on Telegram (Opens in new window) Telegram
    • Share on WhatsApp (Opens in new window) WhatsApp

    Like this:

    Like Loading…

    +

    +

    +

    +

    +

    +

    + Office, PowerShell, SharePoint, Windows
    + CSV, Excel, Export, Office 365, PowerShell, Properties, SharePoint, user profile

    +

    +

    +

    +

    +

    +

    +

    +

    +

    +

    +

    +

  • AWS Elastic Beanstalk ebextensions: Update the IIS App Pool using commands to another App Pool Identity

    07/03/2017

    +

    +

    +

    +

    +

    +

    So I had a .Net application that needed to leverage the Network Service application identity instead of the OOB ApplicationPoolIdentity that comes with a default shipped EBS windows server with IIS. The solution? An ebextenion of course!

    0) We’re going to have a step 0 assuming you already have a development AWS account with credits to push servers to Elastic Beanstalk. If you have not do this part then do some reading here: https://aws.amazon.com/elasticbeanstalk/

    1) Once you have an account and have configured your Visual Studio environment to your account appropriately then proceed to open your VS solution.

    2) Create a folder in your solution called .ebextensions

    3) Create your config file (if you don’t have an editor Notepad++ will do) within that folder and edit it in YAML format

    The following example below will update the DefaultAppPool app identity to Network Service leveraging powershell and the commands/command features:

    [sourcecode]
    files:
    "C:\\Robo\\Update_App_Pool.ps1":
    content: |
    Write-Verbose ‘Update the application pool’
    Set-Location C:\\Robo
    import-module WebAdministration
    Set-ItemProperty IIS:\AppPools\DefaultAppPool -name processModel.identityType -value 2

    commands:
    update_app_pool:
    command: powershell.exe -ExecutionPolicy Bypass -File "C:\\Robo\\Update_App_Pool.ps1"
    ignoreErrors: False
    waitAfterCompletion: 0
    [/sourcecode]

    4) Save the Deploy this with your application into EBS you should see the updated app pool identity as the application is deployed.

    Hope this helps. Questions are welcome!

    If you want to venture deeper into this then start here: http://docs.aws.amazon.com/elasticbeanstalk/latest/dg/customize-containers.html

    Validate here: http://www.yamllint.com/

    Help me out and share!

    • Email a link to a friend (Opens in new window) Email
    • Print (Opens in new window) Print
    • Share on LinkedIn (Opens in new window) LinkedIn
    • Share on Facebook (Opens in new window) Facebook
    • Share on X (Opens in new window) X
    • Share on Reddit (Opens in new window) Reddit
    • Share on Tumblr (Opens in new window) Tumblr
    • More
    • Share on Pinterest (Opens in new window) Pinterest
    • Share on Telegram (Opens in new window) Telegram
    • Share on WhatsApp (Opens in new window) WhatsApp

    Like this:

    Like Loading…

    +

    +

    +

    +

    +

    +

    + .Net, AWS, IIS, Programming, Security, Troubleshooting, Visual Studio, Web
    + app pool, AWS, command, commands, ebextension, ebextensions, identity, IIS, YAML

    +

    +

    +

    +

    +

    +

    +

    +

    +

    +

    +

    +

  • Solved: Issue with SharePoint Rest API Document Upload – Solving the case of the single apostrophe/quote in the URL POST

    04/26/2017

    +

    +

    +

    +

    +

    +

    So I ran across an interesting mystery a while back that I thought I would share the fix for once I had time to document it. I have a client that uses an embeddable SharePoint page within CRM to allow document uploads right from the front entity screens without having to deviate to another screen and for the most part things have been going well. Until…the mystery began.

    The problem: In some sporadic cases when uploading documents via POST to the REST API users would encounter an issue with the dynamically generated URLs from SharePoint that contain single apostrophes or quotes in the library name that would be used in the POST URL.

    Errors may look like:

    [sourcecode]
    {"error":{code":"-1,Microsoft.SharePoint.Client.InvalidClientQueryException","message":{"lang":en-US","value":"The expression\"web/getfolderbyserverrelativeurl(‘yourfolder/O’Lastname, Firstname – 23424ID’)/files/add(overwrite=true,url=’filename.pdf’)\" is not valid."}}}
    [/sourcecode]

    The odd part about that? If you browse the library on its own, it’s fine! However, trying to post to the REST API with an improperly escape quote is not. So let’s fix that.

    The solution: It’s all in how you build the URL with properly escaped characters.

    Snippet in question:

    [sourcecode]
    // Add the file to the file collection in the Shared Documents folder.
    function addFileToFolder(arrayBuffer) {

    // Get the file name from the file input control on the page.
    var parts = fileInput[0].value.split(‘\\’);
    var fileName = parts[parts.length – 1];

    // Construct the endpoint.
    var fileCollectionEndpoint = String.format(
    "{0}/_api/web/getfolderbyserverrelativeurl(‘{1}’)/files" +
    "/add(overwrite=true, url='{2}’)",
    serverUrl, serverRelativeUrlToFolder, fileName);

    // Send the request and return the response.
    // This call returns the SharePoint file.
    return jQuery.ajax({
    url: fileCollectionEndpoint,
    type: "POST",
    data: arrayBuffer,
    processData: false,
    headers: {
    "accept": "application/json;odata=verbose",
    "X-RequestDigest": jQuery("#__REQUESTDIGEST").val(),
    "content-length": arrayBuffer.byteLength
    }
    });

    [/sourcecode]

    Fixed snippet:

    [sourcecode]
    // Add the file to the file collection in the Shared Documents folder.
    function addFileToFolder(arrayBuffer) {

    // Get the file name from the file input control on the page.
    var parts = fileInput[0].value.split(‘\\’);
    var fileName = parts[parts.length – 1];

    // Construct the endpoint.
    var fileCollectionEndpoint = String.format(
    "{0}/_api/web/getfolderbyserverrelativeurl(‘{1}’)/files" +
    "/add(overwrite=true, url='{2}’)",
    serverUrl, serverRelativeUrlToFolder.replace(/\%27/g,"”"), fileName);

    // Send the request and return the response.
    // This call returns the SharePoint file.
    return jQuery.ajax({
    url: fileCollectionEndpoint,
    type: "POST",
    data: arrayBuffer,
    processData: false,
    headers: {
    "accept": "application/json;odata=verbose",
    "X-RequestDigest": jQuery("#__REQUESTDIGEST").val(),
    "content-length": arrayBuffer.byteLength
    }
    });

    [/sourcecode]

    Conclusion? With the replace regex fix in place it will now take every occurance (and not just the first, thanks regex) of a single quote that come as a part of the folder directory and properly escape them when I want to post a file back with the API.

    Key change:

    [sourcecode]
    serverRelativeUrlToFolder.replace(/\%27/g,"”")
    [/sourcecode]

    Everybody wins now, espcially the people out there with apostrophes in there names and folder names with titles that still need the quotes in them! Hope this helps.

    References:

    • Upload a file by using the REST API and jQuery
    • HTML URL Encoding Reference

    Help me out and share!

    • Email a link to a friend (Opens in new window) Email
    • Print (Opens in new window) Print
    • Share on LinkedIn (Opens in new window) LinkedIn
    • Share on Facebook (Opens in new window) Facebook
    • Share on X (Opens in new window) X
    • Share on Reddit (Opens in new window) Reddit
    • Share on Tumblr (Opens in new window) Tumblr
    • More
    • Share on Pinterest (Opens in new window) Pinterest
    • Share on Telegram (Opens in new window) Telegram
    • Share on WhatsApp (Opens in new window) WhatsApp

    Like this:

    Like Loading…

    +

    +

    +

    +

    +

    +

    + API, CRM, JavaScript, Programming, SharePoint, Troubleshooting, Web
    + CRM, escape characters, JavaScript, Rest API, SharePoint, Troubleshooting, Upload

    +

    +

    +

    +

    +

    +

    +

    +

    +

    +

    +

    +

  • Solved: The length of the URL for this request exceeds the configured maxUrlLength value.

    03/12/2017

    +

    +

    +

    +

    +

    +

    Anyone ever run into the following before? I ran into this regarding a request into the SharePoint Rest API.

    The length of the URL for this request exceeds the configured maxUrlLength value.

    This because the IIS default maximum length for an URL is 260 characters. If a URL request is longer, the above error will occur.

    To fix this you can increase the maxURLlength value, add it to your web.config file in the IIS virtual Directory.

    [sourcecode]
    <configuration>

    <system.web>

    <httpRuntime maxUrlLength="5000" />

    </system.web>

    </configuration>
    [/sourcecode]

    It will be likely you will already have most of this snippet in place so don’t break your config; just add the maxUrlLength property into your existing httpRuntime section and you should be good to go. Do know any web.config changes may cause a service interruption so test in dev, beta, QA and pre-prod before ever changing in prod! Hope this helps, questions are welcome!

    Help me out and share!

    • Email a link to a friend (Opens in new window) Email
    • Print (Opens in new window) Print
    • Share on LinkedIn (Opens in new window) LinkedIn
    • Share on Facebook (Opens in new window) Facebook
    • Share on X (Opens in new window) X
    • Share on Reddit (Opens in new window) Reddit
    • Share on Tumblr (Opens in new window) Tumblr
    • More
    • Share on Pinterest (Opens in new window) Pinterest
    • Share on Telegram (Opens in new window) Telegram
    • Share on WhatsApp (Opens in new window) WhatsApp

    Like this:

    Like Loading…

    +

    +

    +

    +

    +

    +

    + .Net, CRM, IIS, MVC, Programming, Security, SharePoint, Sitecore, Troubleshooting, Visual Studio, Web, Web Service, Windows
    + Error, request, SharePoint, Troubleshooting, URL

    +

    +

    +

    +

    +

    +

    +

    +

    +

    +

    +

    +

  • Solved: Method not found: ‘!!0[] System.Array.Empty()’.

    03/12/2017

    +

    +

    +

    +

    +

    +

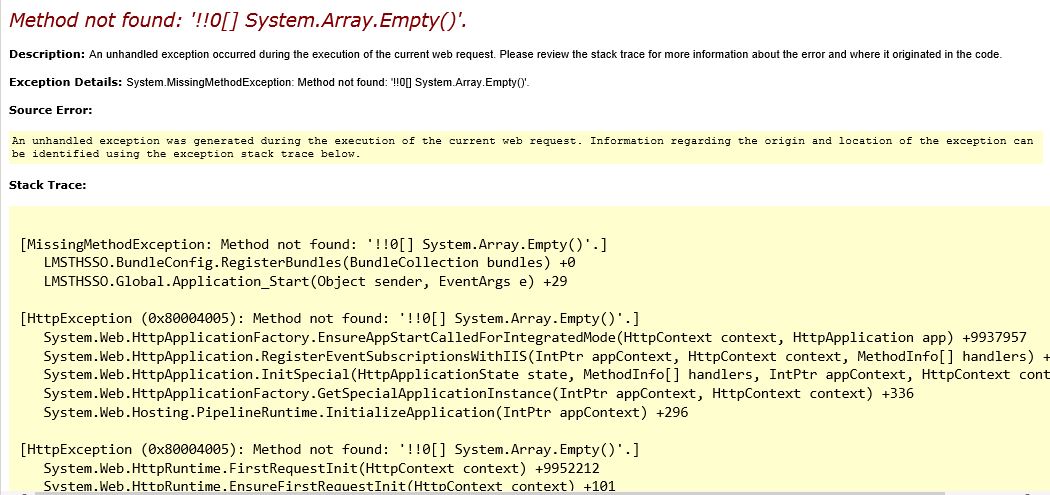
    If you are getting a message for your recently developed .Net application when you publish to the server to the effect of:

    ssnetframeworkerror

    Chances are the server you are deploying to does not have the appropriate framework to support your app.

    Download the Microsoft .Net Framework 4.6.1 and install it to resolve this. It will likely require a server reboot to complete it so don’t do it on prod mid-day! Hope this helps, questions are welcome!

    Help me out and share!

    • Email a link to a friend (Opens in new window) Email
    • Print (Opens in new window) Print
    • Share on LinkedIn (Opens in new window) LinkedIn
    • Share on Facebook (Opens in new window) Facebook
    • Share on X (Opens in new window) X
    • Share on Reddit (Opens in new window) Reddit
    • Share on Tumblr (Opens in new window) Tumblr
    • More
    • Share on Pinterest (Opens in new window) Pinterest
    • Share on Telegram (Opens in new window) Telegram
    • Share on WhatsApp (Opens in new window) WhatsApp

    Like this:

    Like Loading…

    +

    +

    +

    +

    +

    +

    + .Net, IIS, Troubleshooting, Visual Studio, Web, Windows
    + .Net, Error, error message, framework, Troubleshooting

    +

    +

    +

    +

    +

    +

    +

    +

    +

    +

    +

    +

  • A JIRA Priority, Work Estimate and Role Matrix for Standardizing Estimates

    02/22/2017

    +

    +

    +

    +

    +

    +

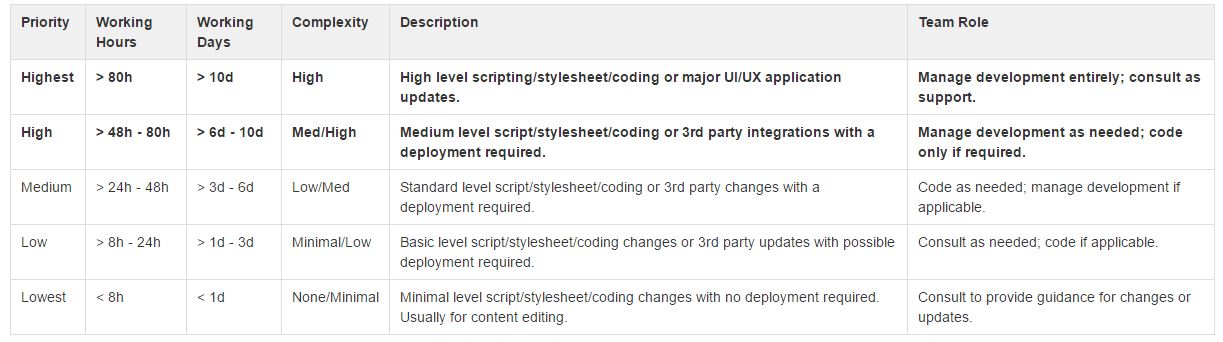
    So as I work to help standardize how the teams I work with estimate effort on their projects I have worked through leveraging JIRA to better help clarify what the priority field could mean. We work in a space where when items go beyond a certain amount of hours that we want to switch from a developer role into a consultant/management role.

    matrix

    If you would like a file with it instead you can get that here. Hope this helps!

    Help me out and share!

    • Email a link to a friend (Opens in new window) Email
    • Print (Opens in new window) Print
    • Share on LinkedIn (Opens in new window) LinkedIn
    • Share on Facebook (Opens in new window) Facebook
    • Share on X (Opens in new window) X
    • Share on Reddit (Opens in new window) Reddit
    • Share on Tumblr (Opens in new window) Tumblr
    • More
    • Share on Pinterest (Opens in new window) Pinterest
    • Share on Telegram (Opens in new window) Telegram
    • Share on WhatsApp (Opens in new window) WhatsApp

    Like this:

    Like Loading…

    +

    +

    +

    +

    +

    +

    + JIRA, Software
    + estimates, JIRA, matrix, priority, role, Software, working days, working hours

    +

    +

    +

    +

    +

    +

    +

    +

    +

    +

    +

    +

  • SharePoint/PowerShell – Get the AD groups associated with a site collection and output to CSV file

    11/21/2016

    +

    +

    +

    +

    +

    +

    Need to deliver or better understand the AD groups associated with your SharePoint site collection? Try this:

    [sourcecode]
    $SPWebApp = Get-SPWebApplication http://sitecollectionURLhere/

    foreach ($SPSite in $SPWebApp.Sites)
    {
    write-host -foregroundcolor green "Working on Site Collection: " + $SPsite.RootWeb.Title
    $SiteURL = $SPsite.RootWeb.URL
    $ADgroup=Get-SPUser -Web $SiteURL -Limit ALL | Where { $_.IsDomainGroup }
    }
    echo $ADgroup | Export-Csv "C:\Temp\FileNameGoesHere.csv"
    [/sourcecode]

    PS1 download is here: https://1drv.ms/u/s!Ag4C3w6EUQIggowvfXrE0Z3tfWKJeA

    Help me out and share!

    • Email a link to a friend (Opens in new window) Email
    • Print (Opens in new window) Print
    • Share on LinkedIn (Opens in new window) LinkedIn
    • Share on Facebook (Opens in new window) Facebook
    • Share on X (Opens in new window) X
    • Share on Reddit (Opens in new window) Reddit
    • Share on Tumblr (Opens in new window) Tumblr
    • More
    • Share on Pinterest (Opens in new window) Pinterest
    • Share on Telegram (Opens in new window) Telegram
    • Share on WhatsApp (Opens in new window) WhatsApp

    Like this:

    Like Loading…

    +

    +

    +

    +

    +

    +

    + PowerShell, Programming, Security, SharePoint, Troubleshooting, Windows
    + AD Groups, CSV, Export, PowerShell, Query, SharePoint

    +

    +

    +

    +

    +

    +

    +

    +

    +

    +

    +

    +

  • .Net MVC – Display a user’s Full Name instead of User.Identity.Name (DOMAIN\USERNAME)

    11/09/2016

    +

    +

    +

    +

    +

    +

    I had a request come in on a MVC web app to display a user’s full name instead of their domain network username. The app was using something like:

    [sourcecode]
    <p>Hello, @User.Identity.Name</p>
    [/sourcecode]

    which displayed like:

    Hello, MYDOMAIN\myusername!

    So to update this on the MVC web app (and avoid a dedicated helper) here is what I did:

    In your _ViewImports.cshtml include:

    [sourcecode]
    @using System.DirectoryServices.AccountManagement
    [/sourcecode]

    Then, in your _Layouts.cshtml place this

    [sourcecode]
    @{
    var context = new PrincipalContext(ContextType.Domain);
    var principal = UserPrincipal.FindByIdentity(context, User.Identity.Name);
    }
    [/sourcecode]

    The above will render the user’s currently logged in claims and return their claim attributes as needed. You can use others as you have them also for other purposes, too.

    Now, in your _Layouts.cshtml you can switch your original hello item to:

    [sourcecode]
    <p>Hello, @principal.GivenName @principal.Surname!</p>
    [/sourcecode]

    You should get a friendlier format like:

    Hello, Jared Meredith!

    Hope that helps. Questions or comments are always welcome!

    Help me out and share!

    • Email a link to a friend (Opens in new window) Email
    • Print (Opens in new window) Print
    • Share on LinkedIn (Opens in new window) LinkedIn
    • Share on Facebook (Opens in new window) Facebook
    • Share on X (Opens in new window) X
    • Share on Reddit (Opens in new window) Reddit
    • Share on Tumblr (Opens in new window) Tumblr
    • More
    • Share on Pinterest (Opens in new window) Pinterest
    • Share on Telegram (Opens in new window) Telegram
    • Share on WhatsApp (Opens in new window) WhatsApp

    Like this:

    Like Loading…

    +

    +

    +

    +

    +

    +

    + .Net, C#, HTML, MVC, Programming
    + .net core, active directory, ASP.Net, claims, full name, MVC, username

    +

    +

    +

    +

    +

    +

    +

    +

    +

    +

    +

    +

  • Troubleshooting “Could not load file or assembly ‘DotNetOpenAuth.Core, Version=4.1.0.0, Culture=neutral, PublicKeyToken=2780ccd10d57b246’ or one of its dependencies”

    08/12/2016

    +

    +

    +

    +

    +

    +

    The Issue:

    After I had updated my .Net Core on my developer machine to a newer version I went to debug a web application I had and received this error:

    Could not load file or assembly 'DotNetOpenAuth.Core, Version=4.1.0.0, Culture=neutral, PublicKeyToken=2780ccd10d57b246' or one of its dependencies. The located assembly's manifest definition does not match the assembly reference. (Exception from HRESULT: 0x80131040)

    The Problem:

    Here is what I had in my config prior to the update install:

    [sourcecode]
    <runtime>
    <assemblyBinding xmlns="urn:schemas-microsoft-com:asm.v1">
    <dependentAssembly>
    <assemblyIdentity name="DotNetOpenAuth.Core" publicKeyToken="2780ccd10d57b246" />
    <bindingRedirect oldVersion="1.0.0.0-4.0.0.0" newVersion="4.1.0.0" />
    </dependentAssembly>
    <dependentAssembly>
    <assemblyIdentity name="DotNetOpenAuth.AspNet" publicKeyToken="2780ccd10d57b246" />
    <bindingRedirect oldVersion="1.0.0.0-4.0.0.0" newVersion="4.1.0.0" />
    </dependentAssembly>
    <dependentAssembly>
    <assemblyIdentity name="EntityFramework" publicKeyToken="b77a5c561934e089" />
    <bindingRedirect oldVersion="0.0.0.0-6.0.0.0" newVersion="6.0.0.0" />
    </dependentAssembly>
    </assemblyBinding>
    </runtime>
    [/sourcecode]

    I had outdated references in my config file.

    The Solution:

    Ensure your references get updated after you update your development environment.

    Here is what I updated to:

    [sourcecode]
    <runtime>
    <assemblyBinding xmlns="urn:schemas-microsoft-com:asm.v1">
    <dependentAssembly>
    <assemblyIdentity name="DotNetOpenAuth.AspNet" publicKeyToken="2780ccd10d57b246" culture="neutral" />
    <bindingRedirect oldVersion="0.0.0.0-4.3.0.0" newVersion="4.3.0.0" />
    </dependentAssembly>
    <dependentAssembly>
    <assemblyIdentity name="DotNetOpenAuth.Core" publicKeyToken="2780ccd10d57b246" culture="neutral" />
    <bindingRedirect oldVersion="0.0.0.0-4.3.0.0" newVersion="4.3.0.0" />
    </dependentAssembly>
    <dependentAssembly>
    <assemblyIdentity name="EntityFramework" publicKeyToken="b77a5c561934e089" />
    <bindingRedirect oldVersion="0.0.0.0-6.0.0.0" newVersion="6.0.0.0" />
    </dependentAssembly>
    </assemblyBinding>
    </runtime>
    [/sourcecode]

    Hope that helps. Questions are always welcome.

    Help me out and share!

    • Email a link to a friend (Opens in new window) Email
    • Print (Opens in new window) Print
    • Share on LinkedIn (Opens in new window) LinkedIn
    • Share on Facebook (Opens in new window) Facebook
    • Share on X (Opens in new window) X
    • Share on Reddit (Opens in new window) Reddit
    • Share on Tumblr (Opens in new window) Tumblr
    • More
    • Share on Pinterest (Opens in new window) Pinterest
    • Share on Telegram (Opens in new window) Telegram
    • Share on WhatsApp (Opens in new window) WhatsApp

    Like this:

    Like Loading…

    +

    +

    +

    +

    +

    +

    + .Net, IIS, Programming, Troubleshooting, Visual Studio, Web, XML
    + .Net, config, core, Error, reference, Troubleshooting, update

    +

    +

    +

    +

    +

    +

    +

    +

    +

    +

    +

    +

  • Encrypting .NET Config Files in a Shared Development Environment

    07/20/2016

    +

    +

    +

    +

    +

    +

    This page will attempt to describe how to encrypt sensitive information contained in .NET config files using the RSA Key Container, as well as how to export/import the key from that container so that other developers may use the same key to work on the same project.

    Helpful Tips: The aspnet_regiis.exe utility must be run as a administrator, otherwise you may receive “duplicate object” errors. In addition, you will want to run Visual Studio as an administrator to ensure the program has access to the RSA Key Container store.

    Creating a Custom RSA Key Container

    In this part we will create an RSA key container by using aspnet_regiis.exe with the -pc option. This identifies the RSA key container as a user-level key container. RSA key containers must be identified as either user-level (by using the -pku option) or machine-level (by not using the -pku option). For more information about machine-level and user-level RSA key containers, see Understanding Machine-Level and User-Level RSA Key Containers.

    In this example the following command will create an RSA key container named SampleKeys that is a machine-level key container and is exportable:

    [sourcecode]
    cd \WINDOWS\Microsoft.Net\Framework\v4.0.*
    aspnet_regiis -pc "SampleKeys"–exp
    [/sourcecode]

    Adding your provider to the web.config

    The following example shows the configProtectedData section of a Web.config file. The section specifies an RsaProtectedConfigurationProvider that uses a machine-level RSA key container named SampleKeys.

    [sourcecode]
    <configProtectedData>
    <providers>
    <add keyContainerName="SampleKeys" useMachineContainer="true" description="RsaCryptoServiceProvider" name="SampleKeys" type="System.Configuration.RsaProtectedConfigurationProvider,System.Configuration, Version=4.0.0.0, Culture=neutral, PublicKeyToken=b03f5f7f11d50a3a" />
    </providers>
    </configProtectedData>
    [/sourcecode]

    Importing and Exporting the Key Container

    In order for another developer to run your project (encrypted by your key) you will need to  export a key to be used by another developer:

    [sourcecode]
    aspnet_regiis -px "SampleKeys" "C:\keys.xml" -pri
    [/sourcecode]

    Once you pass this along to another user to use then import with the following command:

    [sourcecode]
    aspnet_regiis -pi "SampleKeys" "C:\keys.xml"
    [/sourcecode]

    If this is a machine level container, the code should now run without the need to assign permissions. However, if it’s a user container (i.e. your app pool is ran by a specific user or service account), additional permissions may need to be assigned:

    [sourcecode]
    aspnet_regiis -pa "SampleKeys" "NT AUTHORITY\NETWORK SERVICE"
    aspnet_regiis -pa "SampleKeys" "[impersonation account]"
    [/sourcecode]

    To use the default RsaProtectedConfigurationProvider specified in the machine configuration, you must first grant the application’s Windows identity access to the machine key container named NetFrameworkConfigurationKey, which is the key container specified for the default provider. For example, the following command grants the NETWORK SERVICE account access to the RSA key container used by the default RsaProtectedConfigurationProvider:

    [sourcecode]
    aspnet_regiis -pa "NetFrameworkConfigurationKey" "NT AUTHORITY\NETWORK SERVICE"
    [/sourcecode]

    Encrypting and Decrypting Config Sections

    .NET allows specific sections of a config file to be encrypted, so non-sensitive information can still be accessed. To encrypt a section:

    [sourcecode]
    aspnet_regiis -pef [section] [path] -prov [provider]
    [/sourcecode]

    Where [section] is the name of the config section, relative to the configuration tag. [path] is the relative path to the directory containing the web.config file. For example, the following commands will encrypt the appSettings section as well as the impersonation credentials:

    [sourcecode]
    cd C:\SolutionFolder
    aspnet_regiis -pef appSettings ProjectFolder -prov SampleKeys
    aspnet_regiis -pef system.web/identity ProjectFolder -prov SampleKeys
    [/sourcecode]

    To decrypt the appSettings section:

    [sourcecode]
    aspnet_regiis -pdf appSettings ProjectFolder
    [/sourcecode]

    Partially Encrypting a Section

    It may be necessary to only encrypt part of a section in a web.config file. For example, if the appSettings section contains multiple, non-sensitive keys and only a subset contain sensitive information. To encrypt only a few keys, a second appSettings section must be created and the new keys moved into it. The keys are accessed exactly the same way in the code, so no coding changes are needed.

    First, register a new section name called secureAppSettings by placing the following XML under the configuration node:

    [sourcecode]
    <configSections>
    <section name="secureAppSettings" type="System.Configuration.NameValueSectionHandler, System, Version=4.0.0.0, Culture=neutral, PublicKeyToken=b77a5c561934e089" />
    </configSections>
    [/sourcecode]

    Next, create a new section called secureAppSettings and move the sensitive keys under it:

    [sourcecode]
    <secureAppSettings>
    <add key="Username" value="XXX" />
    <add key="Password" value="XXX" />
    </secureAppSettings>
    <appSettings>
    <add key="NotSensitive" value="XXX" />
    </appSettings>
    [/sourcecode]

    Finally, the new secure section can be encrypted and decrypted independently of the existing appSettings section:

    [sourcecode]
    aspnet_regiis -pef secureAppSettings ProjectFolder -prov ProviderName
    [/sourcecode]

    App.config

    This Microsoft utility was designed for web.config files. It will not find app.config files for other project types. To encrypt these config files, just rename them to web.config prior to encrypting, then rename back afterwards.

    Other Helpful Links:

    • ASP.NET Impersonation
    • Importing and Exporting Protected Configuration RSA Key Containers
    • RsaProtectedConfigurationProvider Class
    • Walkthrough: Creating and Exporting an RSA Key Container

    Help me out and share!

    • Email a link to a friend (Opens in new window) Email
    • Print (Opens in new window) Print
    • Share on LinkedIn (Opens in new window) LinkedIn
    • Share on Facebook (Opens in new window) Facebook
    • Share on X (Opens in new window) X
    • Share on Reddit (Opens in new window) Reddit
    • Share on Tumblr (Opens in new window) Tumblr
    • More
    • Share on Pinterest (Opens in new window) Pinterest
    • Share on Telegram (Opens in new window) Telegram
    • Share on WhatsApp (Opens in new window) WhatsApp

    Like this:

    Like Loading…

    +

    +

    +

    +

    +

    +

    + .Net, IIS, Security, Sitecore, Web, XML
    + .Net, config, container, Decryption, developer, Encryption, KEY, Security, share

    +

    +

    +

    +

    +

    +

    +

    +

    +

    +

    +

    +

  • How To Fix “no exports were found that match the constraint” In Visual Studio

    06/09/2016

    +

    +

    +

    +

    +

    +

    So, you have that “no exports were found that match the constraint” message in Visual Studio, eh?

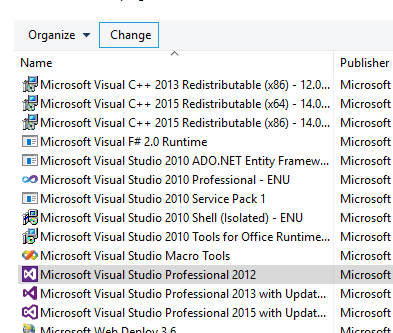
    The first thing I would try doing on the affected version of visual studio is to go to programs and features, select the version and pick change: VSbugss3

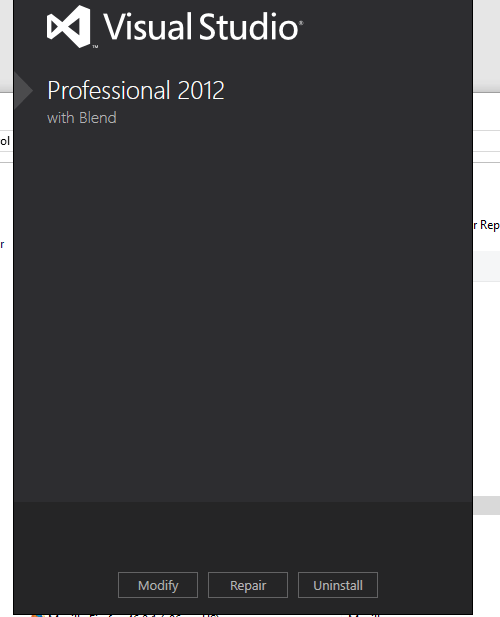
    When that loads let it repair. Once it does see if that resolves the issue.

    VSbugss2

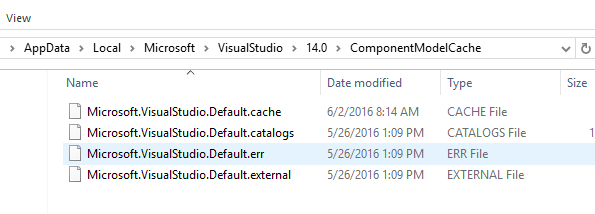
    If it does not a more manual method that is to delete all of the contents of the ComponentModelCache folder from the following area (of which VS version is affected):

    Put your username in the path:

    VS 2012:

    [sourcecode]
    C:\Users\username\AppData\Local\Microsoft\VisualStudio\11.0\ComponentModelCache
    [/sourcecode]

    VS 2013:

    [sourcecode]
    C:\Users\username\AppData\Local\Microsoft\VisualStudio\12.0\ComponentModelCache
    [/sourcecode]

    VS 2015:

    [sourcecode]
    C:\Users\username\AppData\Local\Microsoft\VisualStudio\14.0\ComponentModelCache
    [/sourcecode]

    It should look something like:

    VSbugss1

    If that fails there is also a patch that they released in response: https://www.microsoft.com/en-in/download/confirmation.aspx?id=36020#

    Help me out and share!

    • Email a link to a friend (Opens in new window) Email
    • Print (Opens in new window) Print
    • Share on LinkedIn (Opens in new window) LinkedIn
    • Share on Facebook (Opens in new window) Facebook
    • Share on X (Opens in new window) X
    • Share on Reddit (Opens in new window) Reddit
    • Share on Tumblr (Opens in new window) Tumblr
    • More
    • Share on Pinterest (Opens in new window) Pinterest
    • Share on Telegram (Opens in new window) Telegram
    • Share on WhatsApp (Opens in new window) WhatsApp

    Like this:

    Like Loading…

    +

    +

    +

    +

    +

    +

    + .Net, Troubleshooting, Visual Studio
    + 2012, 2013, 2015, cache, install, programs, repair, Troubleshooting, Visual Studio, Windows

    +

    +

    +

    +

    +

    +

    +

    +

    +

    +

    +

    +

  • Create .pem/.key/.crt Files from a .pfx Certificate Using OpenSSL on Windows

    03/28/2016

    +

    +

    +

    +

    +

    +

    1. First off, go and get OpenSSL:
    • You can use an installer program: https://slproweb.com/products/Win32OpenSSL.html
    • Or if you want a raw zip of the file to store to your preference you can get that here: https://indy.fulgan.com/SSL/

    Now that you are installed and ready to go you should now have a browsable file path to OpenSSL (i.e. C:\OpenSSL)

    2. Obtain your PFX file and (for simplicity) place your PFX file in your OpenSSL directory.

    (In this example we will assume we have a .pfx file called mycertificate.pfx and your OpenSSL directory is C:\OpenSSL)

    3. Run this in command prompt (in your OpenSSL directory) to get the .pem file:
    [sourcecode]
    openssl pkcs12 -in mycertificate.pfx -out mypemfile.pem
    [/sourcecode]
    You should now have a .pem file generated from your PFX file.

    4. Run this in command prompt (in your OpenSSL directory) to extract the encrypted private key:
    [sourcecode]
    openssl pkcs12 -in mypemfile.pem -out myencryptedkey.key
    [/sourcecode]
    You should now have the extracted encrypted private key out of the .pem file.

    5. Run this in command prompt (in your OpenSSL directory) to create a decrypted private key from the encrypted version
    [sourcecode]
    openssl rsa -in myencryptedkey.key -out mydecryptedkey.key
    [/sourcecode]
    You should now have the decrypted private key from your encrypted version.

    6. Run this in command prompt (in your OpenSSL directory) to extract a .crt file from your PFX file:
    [sourcecode]
    openssl pkcs12 -in mycertificate.pfx -clcerts -nokeys -out certificate.crt
    [/sourcecode]
    You should now an extracted .crt file from the PFX file.

    That’s it! You should now have encrypted/decrypted keys as well as your .pem and .crt versions of your original PFX files. Happy certificating (I need to coin that term). Questions are always welcome.

    Help me out and share!

    • Email a link to a friend (Opens in new window) Email
    • Print (Opens in new window) Print
    • Share on LinkedIn (Opens in new window) LinkedIn
    • Share on Facebook (Opens in new window) Facebook
    • Share on X (Opens in new window) X
    • Share on Reddit (Opens in new window) Reddit
    • Share on Tumblr (Opens in new window) Tumblr
    • More
    • Share on Pinterest (Opens in new window) Pinterest
    • Share on Telegram (Opens in new window) Telegram
    • Share on WhatsApp (Opens in new window) WhatsApp

    Like this:

    Like Loading…

    +

    +

    +

    +

    +

    +

    + Certificates, OpenSSL, Windows
    + certificates, command prompt, CRT, decrypted, encrypted, KEY, OpenSSL, PEM, PFX, Windows

    +

    +

    +

    +

    +

    +

    +

    +

    +

    +

    +

    +

  • Sign Into Your SharePoint 2013 Site As A Different User

    03/15/2016

    +

    +

    +

    +

    +

    +

    If you have SharePoint configued to use NTLM with Integrated Windows Authentication (IWA) then it can be tricky to come into your portal as someone other than yourself. There is a cool way to force SharePoint to present a login prompt to check your credentials again. This is very useful especially when you are trying to test with other accounts.

    The trick is to append:
    [sourcecode]
    /_layouts/15/closeConnection.aspx?loginasanotheruser=true
    [/sourcecode]
    to your site collection URL. So if our URL was “http://yoursharepointsite” then the example would be:
    [sourcecode]
    http://yoursharepointsite/_layouts/15/closeConnection.aspx?loginasanotheruser=true
    [/sourcecode]
    Hope this helps, questions are welcome.

    Help me out and share!

    • Email a link to a friend (Opens in new window) Email
    • Print (Opens in new window) Print
    • Share on LinkedIn (Opens in new window) LinkedIn
    • Share on Facebook (Opens in new window) Facebook
    • Share on X (Opens in new window) X
    • Share on Reddit (Opens in new window) Reddit
    • Share on Tumblr (Opens in new window) Tumblr
    • More
    • Share on Pinterest (Opens in new window) Pinterest
    • Share on Telegram (Opens in new window) Telegram
    • Share on WhatsApp (Opens in new window) WhatsApp

    Like this:

    Like Loading…

    +

    +

    +

    +

    +

    +

    + HTML, IIS, SharePoint, Troubleshooting, Web
    + 2013, Link, login, logout, SharePoint, testing, URL, user

    +

    +

    +

    +

    +

    +

    +

    +

    +

    +

    +

    +

  • Help! Need Help Diagnosing A 500 Errors In SharePoint? Try This…

    03/11/2016

    +

    +

    +

    +

    +

    +

    Imagine the nightmare…you decided to sneak in a web part deployment in right before the start of the business day. Right after your deployment you see that the site is about to come back up…and…then nothing. A blank screen. In desperation you open Internet Explorer to try and see if it loads there as well..nothing but a 500 error. Then, the feeling rushes over you that this was a very bad decision. While we should address why you were doing an early morning deployment we shall spare you. 🙂 So what do you do now?

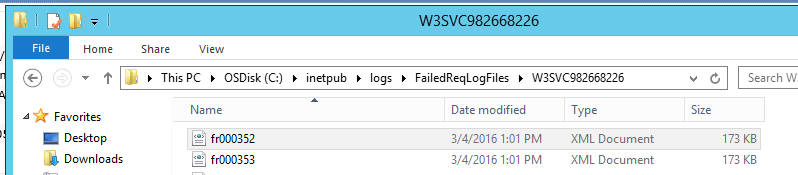
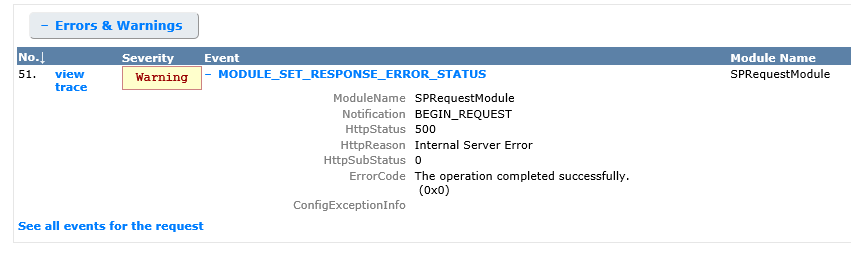
    One of the best ways to see what is going on with a 500 error is to enabled Failed Request Tracing in IIS for the web site in question. Once enabled you can replicate the issue by refreshing the browser a few times; this should be more than enough to capture a few. Once captured then you will usually see where the issue is identified (especially with web.config changes that happen).

    To do this:

    1) Open IIS

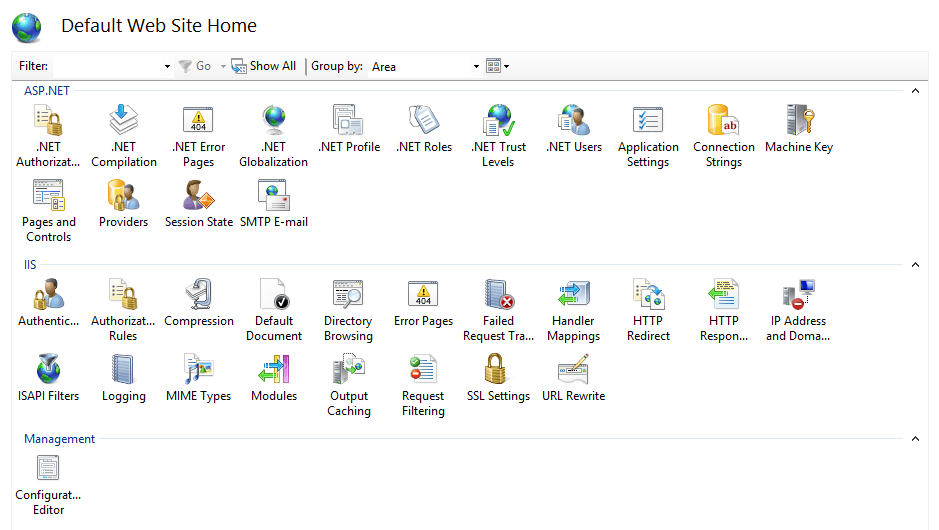
    2) Select the web site in question and open the Features View

    3) Under the IIS section select “Failed Request Tracing” by double-clicking it

    FRT1

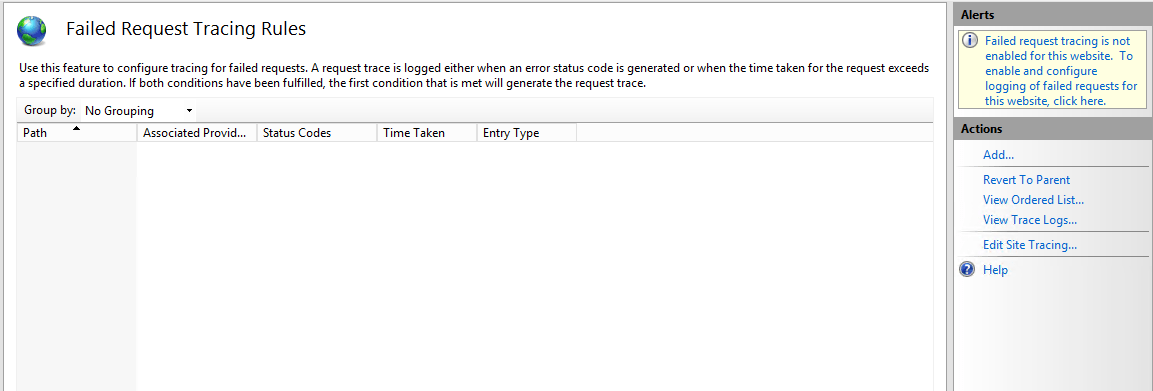
    4) In the top right hand corner click the message in the Alerts section

    FRT2

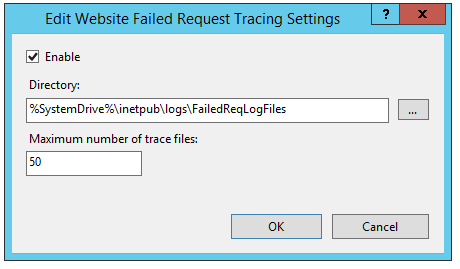
    5) When the pop-up comes up then select to enable and take the default directory (unless you need it elsewhere, then specify another location) and hit OK

    FR3

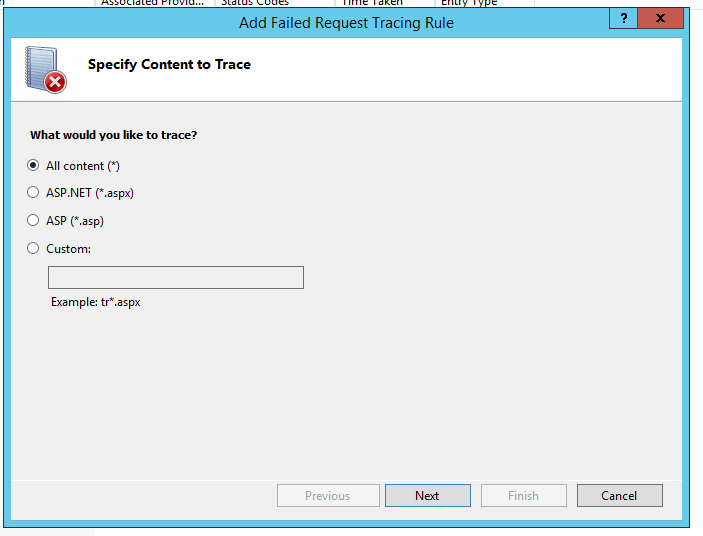
    6) Next, under actions select “Add…” and select “All content (*)” and click Next

    FRT4

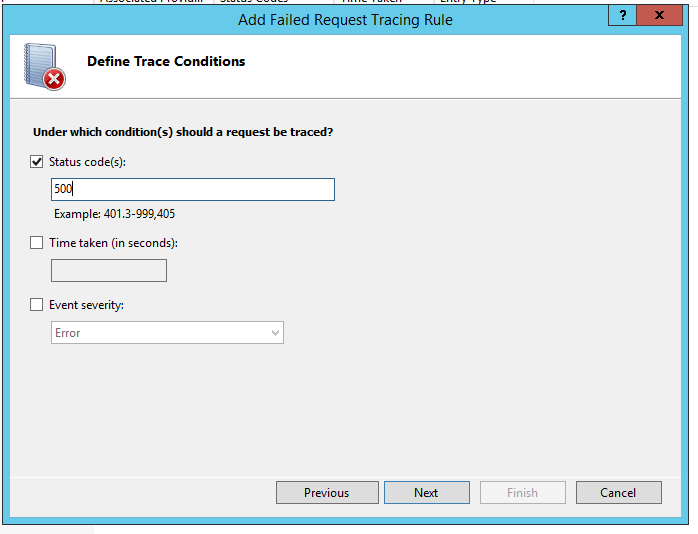
    7) Indicate the status code of 500 (and others where applicable) and click next again

    Frt5

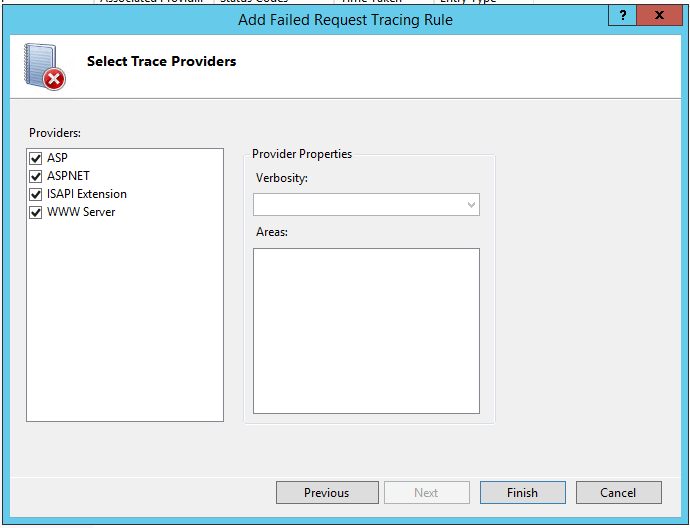
    8) Indicate your trace providers and click Finish

    FRT6

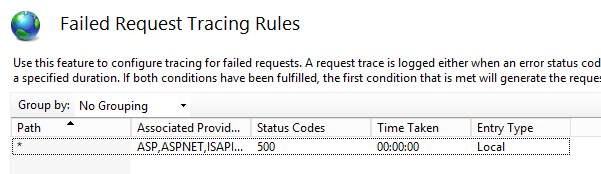
    You should now see your created Failed Request Tracing Rules.

    FRT7

    Now go and refresh the browser a couple times to see your error again. Once that is logged then go to the trace logs. To find that location go back to the site in features view, select Failed Request Tracing and select “View Trace Logs…”

    FR8

    Double click to view the recorded log (you can use IE):

    FRT9

    Viewing these should at least help to identify the obvious when it is a line in the web.config or when there has been a setting changed as a result of saving a configuration option in SharePoint (or 3rd party products or web parts in SharePoint). Hope this helps, happy troubleshooting. Questions are always welcome.


    Help me out and share!

    • Email a link to a friend (Opens in new window) Email
    • Print (Opens in new window) Print
    • Share on LinkedIn (Opens in new window) LinkedIn
    • Share on Facebook (Opens in new window) Facebook
    • Share on X (Opens in new window) X
    • Share on Reddit (Opens in new window) Reddit
    • Share on Tumblr (Opens in new window) Tumblr
    • More
    • Share on Pinterest (Opens in new window) Pinterest
    • Share on Telegram (Opens in new window) Telegram
    • Share on WhatsApp (Opens in new window) WhatsApp

    Like this:

    Like Loading…

    +

    +

    +

    +

    +

    +

    + IIS, SharePoint, Troubleshooting
    + 500, Error, Logs, SharePoint, tracing, Troubleshooting, web part, xml

    +

    +

    +

    +

    +

    +

    +

    +

    +

    +

    +

    +

  • How to deal with: WARN An invalid character was found in the mail header: ‘,’ in Sitecore

    02/29/2016

    +

    +

    +

    +

    +

    +

    If you are using Web Forms for Marketers in Sitecore then you may have an occasion where the email addresses that are being used to send messages to get updated by someone…then all of a sudden you start getting errors…then all of a sudden your phone starts ringing off the hook, right?

    So in the Sitecore logs you will see something similar to:

     868 13:12:53 WARN An invalid character was found in the mail header: ','.
    Exception: System.FormatException
    Message: An invalid character was found in the mail header: ','.
    Source: System
     at System.Net.Mail.DotAtomReader.ReadReverse(String data, Int32 index)
     at System.Net.Mail.MailAddressParser.ParseDomain(String data, Int32& index)
     at System.Net.Mail.MailAddressParser.ParseAddress(String data, Boolean expectMultipleAddresses, Int32& index)
     at System.Net.Mail.MailAddressParser.ParseMultipleAddresses(String data)
     at System.Net.Mail.MailAddressCollection.ParseValue(String addresses)
     at System.Net.Mail.Message..ctor(String from, String to)
     at System.Net.Mail.MailMessage..ctor(String from, String to)
     at System.Net.Mail.MailMessage..ctor(String from, String to, String subject, String body)
     at Sitecore.Form.Core.Pipelines.ProcessMessage.ProcessMessage.GetMail(ProcessMessageArgs args)
     at (Object , Object[] )
     at Sitecore.Pipelines.CorePipeline.Run(PipelineArgs args)
     at Sitecore.Form.Core.Submit.SubmitActionManager.ExecuteSaving(ID formID, ControlResult[] list, ActionDefinition[] actions, Boolean simpleAdapt, ID sessionID)

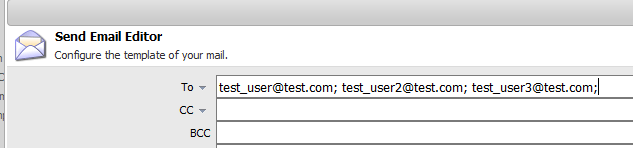
    Huh? OK, so let’s go look at the Web Form Send Email action in question:

    ss1wffm

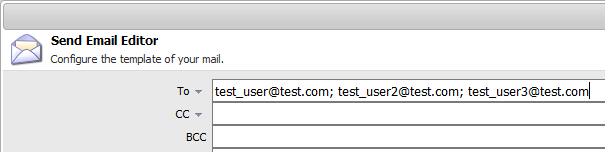
    Nothing looks odd at first…until upon further research: I discovered after some reading about mail headers that the last entry of the recipients (To, CC, BCC) cannot accept a separator delimiter as a character on the end. You’ll also notice in outlook and other email clients that the behavior is the same.

    The fix? remove the last character and save/republish your form. Problem solved!

    ss2wffm

    Hope this helps. Questions are welcome!

    Help me out and share!

    • Email a link to a friend (Opens in new window) Email
    • Print (Opens in new window) Print
    • Share on LinkedIn (Opens in new window) LinkedIn
    • Share on Facebook (Opens in new window) Facebook
    • Share on X (Opens in new window) X
    • Share on Reddit (Opens in new window) Reddit
    • Share on Tumblr (Opens in new window) Tumblr
    • More
    • Share on Pinterest (Opens in new window) Pinterest
    • Share on Telegram (Opens in new window) Telegram
    • Share on WhatsApp (Opens in new window) WhatsApp

    Like this:

    Like Loading…

    +

    +

    +

    +

    +

    +

    + Email, Sitecore, Troubleshooting
    + Email, Email Headers, Logs, sitecore, Web Forms For Marketers

    +

    +

    +

    +

    +

    +

    +

    +

    +

    +

    +

    +

  • JavaScript HTML Redirect To Another URL

    02/03/2016

    +

    +

    +

    +

    +

    +

    There may be cases where you don’t have as free of access to the meta information or web.config to set redirects in place. You can also do this with JavaScript!

    Here’s the snippet (place this in between script tags in the body or applicable section in the body that allows HTML):

    [sourcecode language=”javascript”]
    <script type="text/javascript">
        window.location.replace("http://www.yourexamplesite.com/some-other-page.html&quot;);
    </script>
    [/sourcecode]

    Hope that helps.

    Help me out and share!

    • Email a link to a friend (Opens in new window) Email
    • Print (Opens in new window) Print
    • Share on LinkedIn (Opens in new window) LinkedIn
    • Share on Facebook (Opens in new window) Facebook
    • Share on X (Opens in new window) X
    • Share on Reddit (Opens in new window) Reddit
    • Share on Tumblr (Opens in new window) Tumblr
    • More
    • Share on Pinterest (Opens in new window) Pinterest
    • Share on Telegram (Opens in new window) Telegram
    • Share on WhatsApp (Opens in new window) WhatsApp

    Like this:

    Like Loading…

    +

    +

    +

    +

    +

    +

    + HTML, JavaScript, Web
    + HTML, JavaScript, redirect, script

    +

    +

    +

    +

    +

    +

    +

    +

    +

    +

    +

    +

  • Need To Clean Your IIS Log Files (Older Than x Number of Days) For All Sites? Here’s a Script

    01/15/2016

    +

    +

    +

    +

    +

    +

    You may have the classic issue of needing logs cleared but you do not have time to log onto each server and delete files for space. Here’s a script that will do it for all IIS sites and will let you select how many days back you wish to keep. For this example this script is wrote for 30 days and would be run on a task scheduler monthly.

    • Open notepad and create a file called IISLogMonthlyCleanup.vbs
    • Put in the following snippet and adjust your settings to apply to what you need:

    [sourcecode]
    sLogFolder = "c:\inetpub\logs\LogFiles"
    iMaxAge = 30 ‘ # of days
    Set objFSO = CreateObject("Scripting.FileSystemObject")
    set colFolder = objFSO.GetFolder(sLogFolder)
    For Each colSubfolder in colFolder.SubFolders
    Set objFolder = objFSO.GetFolder(colSubfolder.Path)
    Set colFiles = objFolder.Files
    For Each objFile in colFiles
    iFileAge = now-objFile.DateCreated
    if iFileAge &gt; (iMaxAge+1) then
    objFSO.deletefile objFile, True
    end if
    Next
    Next
    [/sourcecode]
    Save and run. *Poof* the old logs are gone. Set it up in a task scheduler and move on to more important things.

    TIP: You can run the scheduled task as SYSTEM since it has privileges to run whether logged on or not. It also has access to the file system.

    Hope this helps.

    Help me out and share!

    • Email a link to a friend (Opens in new window) Email
    • Print (Opens in new window) Print
    • Share on LinkedIn (Opens in new window) LinkedIn
    • Share on Facebook (Opens in new window) Facebook
    • Share on X (Opens in new window) X
    • Share on Reddit (Opens in new window) Reddit
    • Share on Tumblr (Opens in new window) Tumblr
    • More
    • Share on Pinterest (Opens in new window) Pinterest
    • Share on Telegram (Opens in new window) Telegram
    • Share on WhatsApp (Opens in new window) WhatsApp

    Like this:

    Like Loading…

    +

    +

    +

    +

    +

    +

    + Throwback Archive
    + IIS, Logs, Programming, Scripting, task scheduler, VBS

    +

    +

    +

    +

    +

    +

    +

    +

    +

    +

    +

    +

  • Using Encryption and Decryption on a .Net Web.Config ConnectionString

    01/14/2016

    +

    +

    +

    +

    +

    +

    If you have .Net web applications that are connecting to data sources that you do not want other users to know about then chances are it is about time to start encrypting the connection strings. Why is this important? If you have an external website that fails (and you do not have any custom error pages) then you may expose connection information in the stack trace or error messages. Also, you do not want to allow other developers that stumble upon your connection string to see your connection information in clear text. Over time and many applications later I went from trying to remember paths and commands and have created batch files to perform this on a minimal web.config.

    I am going to walk through how to create some encrypt/decrypt batch files and how these are used in conjunction with your web.config.

    • Ensure you have a .Net Framework installed to use the aspnet_regiis.exe program. For this example we are using .Net Framework 4.0.
    • Create a folder for all of your files to sit inside of. For this demo let’s call the folder “decrypter”. Make note of where you are storing this folder to use in your batch files in the next steps. For this example let’s assume “C:\decrypter”
    • Open notepad and create a file named Decrypt.bat and add the following information (take note of the path you’ll need to update based on where you are going to store your folder):

    [sourcecode]
    echo Decrypting connection strings
    C:\Windows\Microsoft.NET\Framework64\v4.0.30319\aspnet_regiis.exe -pdf "connectionStrings" "C:\decrypter"
    Pause
    [/sourcecode]

    • Open notepad again and create a file named Encrypt.bat and add the following information (take note of the path you’ll need to update based on where you are going to store your folder):

    [sourcecode]
    echo Encrypting connection strings
    C:\Windows\Microsoft.NET\Framework64\v4.0.30319\aspnet_regiis.exe -pef "connectionStrings" "C:\decrypter"
    Pause
    [/sourcecode]

    • Open notepad again and create a web.config file and insert your connectionstrings section inside (make sure to place this file in the same location as the batch files, you’ll use this over and over):

    [sourcecode]
    <?xml version="1.0" encoding="utf-8"?>
    <configuration>
    <connectionStrings>
    <add name="Demo" connectionString="Data Source=123.45.67.89;Initial Catalog=DemoCatalog;Persist Security Info=True;User ID=specialuser;Password=specialpassword" providerName="System.Data.SqlClient" />
    </connectionStrings>
    </configuration>
    [/sourcecode]

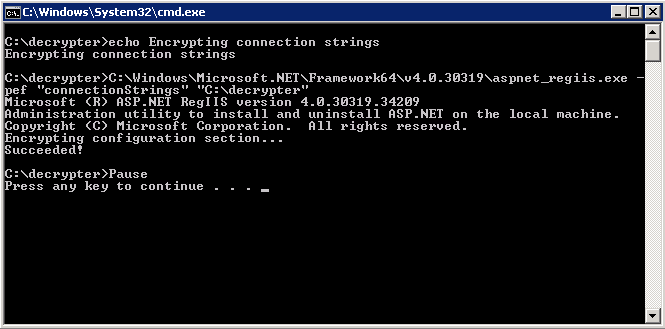
    • Once you have that saved, run your Encrypt.bat as administrator. You should see the following:

    en-example

    • Your connection strings are now encrypted. Review your web.config and see:

    [sourcecode]
    <?xml version="1.0" encoding="utf-8"?>
    <configuration>
    <connectionStrings configProtectionProvider="RsaProtectedConfigurationProvider">
    <EncryptedData Type="http://www.w3.org/2001/04/xmlenc#Element&quot;
    xmlns="http://www.w3.org/2001/04/xmlenc#"&gt;
    <EncryptionMethod Algorithm="http://www.w3.org/2001/04/xmlenc#tripledes-cbc&quot; />
    <KeyInfo xmlns="http://www.w3.org/2000/09/xmldsig#"&gt;
    <EncryptedKey xmlns="http://www.w3.org/2001/04/xmlenc#"&gt;
    <EncryptionMethod Algorithm="http://www.w3.org/2001/04/xmlenc#rsa-1_5&quot; />
    <KeyInfo xmlns="http://www.w3.org/2000/09/xmldsig#"&gt;
    <KeyName>Rsa Key</KeyName>
    </KeyInfo>
    <CipherData>
    <CipherValue>You’ll Have A Cipher Here.</CipherValue>
    </CipherData>
    </EncryptedKey>
    </KeyInfo>
    <CipherData>
    <CipherValue>You’ll Have A Cipher Here.</CipherValue>
    </CipherData>
    </EncryptedData>
    </connectionStrings>
    </configuration>
    [/sourcecode]

    • You can now take the connectionStrings section and replace your cleartext version for your application.
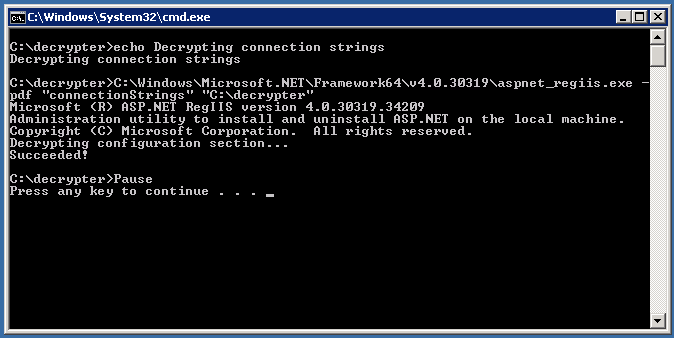
    • Should you ever need to update your connectionStrings simply place the encrypted version back on your minimal web.config and run the Decrypt.bat (as administrator). This is what you should see:

    de-example

    • You should then see your original clear text connection string. Hope this helps.
    • Things of note:
      • You can also do this with other sections of the web.config (just rename connectionStrings to whatever section you need to encrypt)
      • If you have comments inside of your connectionString the encryption and decryption will remove them.
      • Another reference: https://msdn.microsoft.com/en-us/library/zhhddkxy.aspx

    Help me out and share!

    • Email a link to a friend (Opens in new window) Email
    • Print (Opens in new window) Print
    • Share on LinkedIn (Opens in new window) LinkedIn
    • Share on Facebook (Opens in new window) Facebook
    • Share on X (Opens in new window) X
    • Share on Reddit (Opens in new window) Reddit
    • Share on Tumblr (Opens in new window) Tumblr
    • More
    • Share on Pinterest (Opens in new window) Pinterest
    • Share on Telegram (Opens in new window) Telegram
    • Share on WhatsApp (Opens in new window) WhatsApp

    Like this:

    Like Loading…

    +

    +

    +

    +

    +

    +

    + .Net, IIS, Programming, Web, XML
    + .Net, batch file, connection string, Decryption, Encryption, web application, web.config

    +

    +

    +

    +

    +

    +

    +

    +

    +

    +

    +

    +

  • Stuck On “Cannot Load php7apache2_4.dll into server: The specified module could not be found”? Try this…

    12/21/2015

    +

    +

    +

    +

    +

    +

    I recently just performed a PHP upgrade from 5.6.15 to 7.0.1. After doing everything I had suspected I needed to do I received this error in my logs when trying to start Apache:

    httpd.exe: Syntax error on line 569 of C:/Program Files (x86)/Apache Software Foundation/Apache24/conf/httpd.conf: Cannot load C:/Program Files (x86)/PHP.7.0.1/php7apache2_4.dll into server: The specified module could not be found.

    Here is what I had in that block, bolding the item in question:

    LoadModule php7_module "C:/Program Files (x86)/PHP.7.0.1/php7apache2_4.dll"
    AddHandler application/x-httpd-php .php
    PHPIniDir "C:/Program Files (x86)/PHP.7.0.1/"

    Huh??? I checked and double checked and that file was there. After about 2 hours of scratching my head I then found a forum post that clicked for me. You may not be recognizing the .dll file because it has a dependency on the Visual C++ Redistributable for Visual Studio 2015. Once I downloaded and installed the exe files (located here) then after another restart I started seeing my pages again. Hope it helps.

    Help me out and share!

    • Email a link to a friend (Opens in new window) Email
    • Print (Opens in new window) Print
    • Share on LinkedIn (Opens in new window) LinkedIn
    • Share on Facebook (Opens in new window) Facebook
    • Share on X (Opens in new window) X
    • Share on Reddit (Opens in new window) Reddit
    • Share on Tumblr (Opens in new window) Tumblr
    • More
    • Share on Pinterest (Opens in new window) Pinterest
    • Share on Telegram (Opens in new window) Telegram
    • Share on WhatsApp (Opens in new window) WhatsApp

    Like this:

    Like Loading…

    +

    +

    +

    +

    +

    +

    + Apache, PHP, Troubleshooting, Web
    + apache, C#, conf, Dll, HTTP, PHP

    +

    +

    +

    +

    +

    +

    +

    +

    +

    +

    +

    +

Previous
1 2 3
Next

Linkedin

Tumblr

GitHub

Mastodon

Designed with WordPress.

Loading Comments...
%d